
Ducati Diavel Service Manual: Removal of the licence plate holder

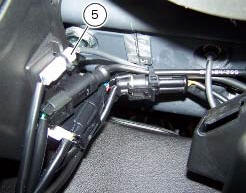
Disconnect connector (5) of the number plate holder wiring from the main one.
Release the number plate holder light cable from the ties and the cable grommets as indicated in sect- 7 - 6, flexible wiring/hoses positioning, since the cable is together with the rear abs sensor cable.
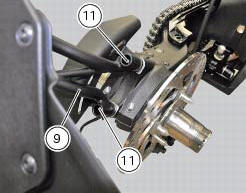
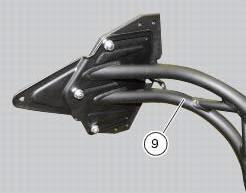
Undo the screws (11) and remove the number plate holder assembly (9) from the swingarm.
 Tail light - number plate holder
Rh tail light
Vibration damper mount
Spacer
Screw
Number plate light
Screw
Screw
Plate
Number plate holder
Nut
Screw
Rear chain guard
Lh tail light
Spring washer
Vib ...
 Refitting the number plate holder
Place the number plate light (5), as indicated, on the number plate holder
plate (8) and tighten the screws (7) to a torque
of 2 nm +/- 10% (sect. 3 - 3, Frame torque settings).
Thread the numbe ...
Other materials:
Beam setting
When checking beam setting, put the motorcycle upright.
Tyres should be inflated at the correct pressure and one
person should be sitting astride the motorcycle, keeping it at
right angles to its longitudinal axis. Place the motorcycle
opposite a wall or a screen, 10 meters apart from it, draw ...
Engine
Twin cylinder, four-stroke, 90 "l" type, longitudinal, with
deep sump die-cast crankcase.
Bore, mm: 106
Stroke, mm:
67.9
Total displacement, cu. Cm:
1198
Compression ratio:
11.5±0.5:1
Max power at crankshaft (95/1/ec), kw/hp:
119 kw/162 hp at 9,500 rpm
Max torque at crankshaf ...
Steering head: steering
Screw
Steering head
Screw
Lower rh u-bolt
Lower lh u-bolt
Bearing
Screw
Sealing ring
Washer
Spacer
Washer
Nut
Washer
Screw
Bottom yoke
Dowel
Nut
Screw
Special screw
Clip nut
Left-hand support
Front splashguard
Right-hand support
Front support
S ...