
Ducati Diavel Service Manual: Removal of the movable tensioner/timing belt
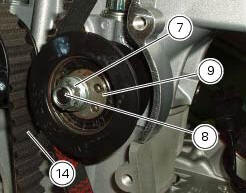
Loosen the nut (8) and remove the washer (7) and the tensioner pulley (9) from the pin (12) on the cylinder head.
Remove the timing belt (14) from the horizontal cylinder assembly.
Important
If the belts are to be re-used, mark the direction of rotation with an arrow and also mark the cylinder they belong to.
Repeat the procedure for the other cylinder.
 Removal of the timing belt covers
Loosen the screws (4) securing the central external cover (1) and remove it
from the central side.
Undo the fixing screws (4) of the external cover (25) and remove it from the
vertical therma ...
 Removing of the cylinder head pulley/fixed tensioner
Insert the tool code 88713.1806 In the pulleys to lock their rotation and use
the bush supplied to loosen the fixing nuts
(21) of the pulleys.
important
On reassembly, always use new nuts.
Remov ...
Other materials:
Limitations
This emission control system warranty shall not cover any
of the following:
Repair or replacement required as a result of
Accident,
Misuse,
Repairs improperly performed or replacements improperly
installed,
Use of replacement parts or accessories not conforming
to ducati specifi ...
Refitting the rear-view mirrors
Start the screws (2) in their thread on the rear-view mirrors (1), inserting
the washers (4) as shown in the picture.
Insert the rear-view mirrors (1) in the u-bolts (3).
Tighten the screws (2) to a torque of 25 nm +/-10% (sect. 3 - 3, Frame torque
settings).
Warning
The left rear-view ...
Key-on/key-off using the pin code (immobilizer release)
Key-on can be performed by pressing the button (7) on the
hands free lock (1, fig. 77) Without the presence of the keys
(3, fig. 77) And (4, fig. 77) And entering the pin code on the
dashboard.
Key-off can be performed by pressing the button (6) on the
handlebar / hands free key (7) / engine ...