
Ducati Diavel Service Manual: Removal of the shock absorber support
Remove the rear brake master cylinder (sect. 7 - 4, Removing of the rear brake control).
Remove the rear shock absorber (see removal of the rear shock absorber of this section).
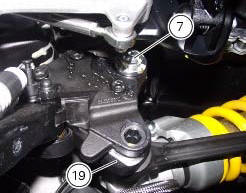
Loosen the screws (2) and (7) and their nuts (35).
Remove the side stand (sect. 7 - 16, Removing of the side stand).
 Refitting the rear suspension
Lubricate the thread and underside of the special screw (1).
Insert the lower side of the shock absorber into the swingarm and insert the
screw (1).
Tighten the screw (1) to a torque of 45 nm ...
 Refitting the shock absorber support
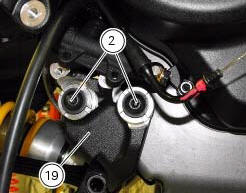
If you had removed them, apply recommended grease on the threads of the
adjusters (4) and the ring nuts (3) having
care not to have grease on the surface (c) of the adjusters.
Tighten the adjust ...
Other materials:
Dashboard menu option scrolling not possible
Fault codes
Dds: no fault code displayed
Dashboard: no fault code displayed
Location of connections and components
Location of left hand handlebar switchgear set connection.
Pin numbering for wiring harness side dashboard connector. ...
Refitting the oil pump
If removed, apply specific threadlocker on the bushing (7) outer thread, and
screw it in the crankcase half, observing the
height.
Position the reference bushings (15) and the oil sealing o-rings (2) and (4)
according to the crankcase lubrication
channels.
Position the oil pump on th ...
Lcd unit functions
Speedometer.
Gives road speed
Rev counter.
Indicates engine revs per minute.
Clock.
Water temperature indicator.
Indicates engine coolant temperature.
Important
Stop riding if the temperature reaches the maximum value, otherwise the
engine might be damaged.
...