
Ducati Diavel Service Manual: Removal of the throttle twistgrip
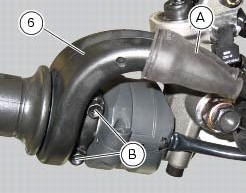
Peel back the rubber sleeve (a) protecting the throttle control cables.
Undo the screws (b) of the throttle grip (6) and open the command.
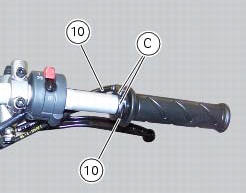
Disconnect the throttle grip cables (10) by unhooking the cable ends (c) from their seats.
Remove the throttle twistgrip (6) from the handlebar.
To replace the throttle grip cables, it is necessary to remove it from the throttle body (sect. 8 - 6, Removal the airbox and throttle body).
Replacement throttle cables are supplied complete with adjusters.
 Refitting the handlebar
Position the handlebar (4) so that the external lower corner of the marks (a)
on the handlebar matches the upper internal
corner of the lower u-bolts (b) as shown.
Apply the recommended grease ...
 Refitting the throttle twistgrip
Lubricate the ends of the throttle grip cables (10) and the twistgrip race
with the recommended grease.
The closing cable (10) features a writing on the yellow tube, whereas the
opening one (10 ...
Other materials:
On/off switch on handlebar
Introduction
The on/off switch on the handlebar is used to switch the dashboard on and
off, if a key has been detected, and start the
engine.
With the switch turned to "run off" (centre position), pushing downwards
switches the dashboard on or off (activating
the button inside the switch). ...
Resetting turn indicators not possible - accessing dashboard menu not
possible
Fault codes
Dds: no fault code displayed
Dashboard: no fault code displayed
Location of connections and components
Location of left hand handlebar switchgear set connection.
Pin numbering for wiring harness side dashboard connector.
Checks
Test turn indicator reset button function. Wh ...
Lap registration function
This function describes the "lap" time registration.
If the function is activated (see "lap activation/deactivation
description), the lap time can be registered as follows:
Pressing the flash headlight button (11, fig. 12) The first
time starts the "lap timer" for ...