
Ducati Diavel Service Manual: Removal of the water pump
Note
For clarity, the figures show the engine removed from the frame.
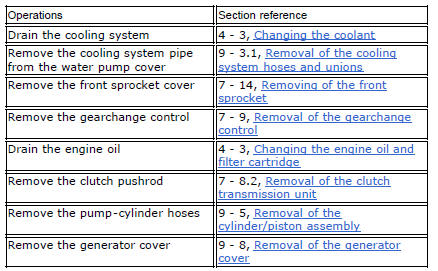
Loosen and remove the water pump cover (12) fixing screws (13) to the generator cover (16).
Remove the water pump cover (12).
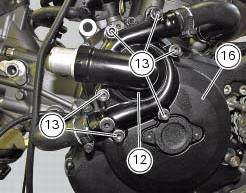
Clean the pump housing of any scale. Check the bearings wear by turning the impeller shaft (10); in case of excessive clearance, it is necessary to replace them by operating as follows.
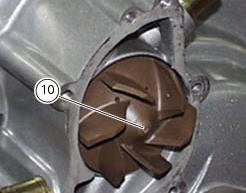
Remove the circlip (3) on the impeller shaft.
Slide off the rotor (10) with the sealing ring (9) from the outside.
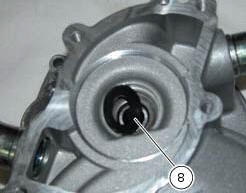
Recover the ceramic washer - seal unit (8) placed on the internal side.

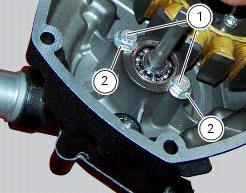
Undo and remove the screws (1) with the washer (2).
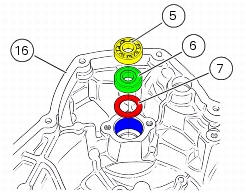
Working from the generator cover (16) internal side, use a suitable punch to press on the inner race of end bearing (5) until it can be extracted from the cover.
Use the same technique to remove the other bearing (6).
Remove the inner spacer (7).
Check the condition of the components of the mechanical seal: there should be no signs of deformation, cracking, or excessive wear. In the case of damage, both components must be renewed.
 Water pump
Screw
Washer
Circlip
Water pump outlet union
Bearing
bearing
Spacer
Aluminium gasket
Mechanical seal
Water pump impeller
Bush
Water pump cover assembly
Screw
Plug
Se ...
 Refitting the water pump
Clean the seat on the cover, any parts you intend to reuse, and the impeller
shaft. Then refit as follows.
Fit on the impeller (10) shaft the mechanical seal (9) as indicated in the
figure.
...
Other materials:
Vehicle speed indicator
this function displays vehicle speed (km/h or mph
depending on the set measurement system).
the instrument panel receives information about the actual
speed and displays the number increased by 5%.
maximum speed displayed is 299 km/h (186 mph).
over 299 km/h (186 mph) a series of dashes w ...
Refitting the side stand
Place the stand plate on the rear shock absorber support; bring adjuster (14)
in line with bracket (s) and start the screw
(12) in the nut behind the bracket (s).
Insert the screws (11), (3) and (10) fully home in this order, but do not
tighten.
Loosen the screw (12) with the relative nut ...
Disassembling the water radiator unit
The procedure is the same for both radiators.
Loosen the screws (15), (21) and (25) to remove the air duct (24) from the right
radiator (13).
Undo the screws (12) and (14) to remove the half-fairing (23) from the
radiator.
Radiator inspection
Visually inspect the oil co ...