
Ducati Diavel Service Manual: Removing of the front sprocket
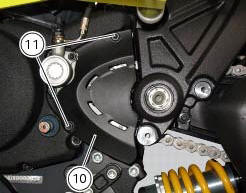
Undo the screws (11) and remove the chain cover (10).
Loosen the chain (sect. 4 - 3, Adjusting the chain tension).
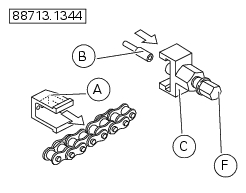
Remove the chain with the tool code 88713.1344.
The tool is composed of a holder (a), punch (b), body (c) and two wrenches (d) and (e).
Fit the link to be opened into the holder (a).
Fit a punch (b) into the body (c) and manually unscrew the screw until the punch no longer protrudes.
Fit the holder (a) and link into the body (c).
Manually turn the screw (f) on body (c) so that the punch (b) locates against the pin, taking care that they are aligned with each other.
Fit hex wrench (d) into the hexagonal part of the body (c) and wrench (e) onto the bolt.
Turn the bolt (f) clockwise to push out the pin.
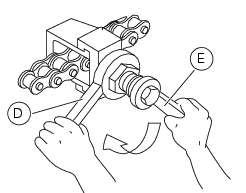
Remove the chain.
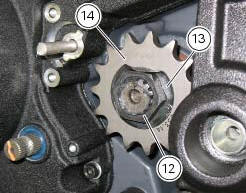
Engage a low gear and unscrew the nut (12).
Remove the nut (12) and the safety washer (13) on the pinion.
Remove the engine pinion (14) from the gearbox secondary shaft.
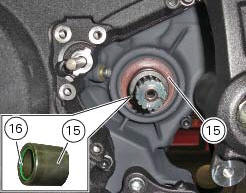
Remove the spacer (15) with o-ring (16) from the gearbox secondary shaft.
Important
The o-ring (16) must be renewed on reassembly.
 Inspecting the final drive
To check the wear of the final drive, visually check the pinion (14) and
sprocket (17). If the teeth are found to worn as
shown in the figure (dotted line), the sprocket must be renewed.
T ...
 Refitting the front sprocket
Grease the o-ring (16) and install it on the front sprocket spacer (15).
Fit the spacer, from the o-ring side, on the secondary shaft and drive it fully
home against the inner ring of the bearing ...
Other materials:
Overhaul of the crankcase halves
Carefully examine the engine crankcase halves.
Check that the surfaces of the crankcase halves are perfectly flat using a
reference surface.
Check that the bearings (1) and (18), and the bushings (2) and (17) are in
optimum conditions. Note that the main
bearings must always be changed in p ...
Immobilizer override procedure
This procedure makes it possible to "temporarily" turn on the motorcycle if
the hf (hands free) system is not working.
Note
The pin code function must be activated by entering your 4 digit pin in
the dashboard, otherwise the vehicle cannot be
turned on temporarily in the case of a malfunction ...
Reassembly of structural components and the frame
Check for the nuts with clips (8).
Apply recommended grease on the threads of the adjusters (4) and the ring
nuts (5) having care not to have grease on
the surface (c) of the adjusters.
Tighten the adjusters on the ring nut side opposite to that featuring flats
until bringing the surfac ...