
Ducati Diavel Service Manual: Removing the flywheel - generator assembly
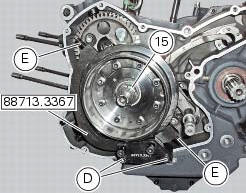
Use the tool 88713.3367 Fixed to the m10 side stand fixing holes (d).
Secure the tool to the flywheel with the screws (e).
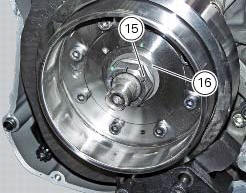
Unscrew the alternator-flywheel retaining nut (15).
Warning
While unscrewing the nut, apply axial pressure to the socket to avoid damage or injury in the event of the wrench suddenly slipping off the nut.
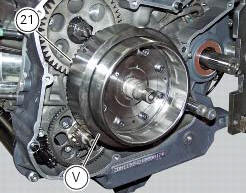
Remove the nut (15), the washer (16) and the flywheel assembly (v) with the driven gear (21) from the crankshaft.
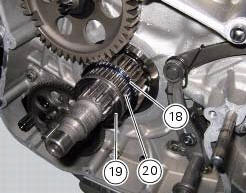
Remove the inner race (19), the needle roller bearing (20) and the washer (18).
Important
Check the race (19), the needle roller bearing (20) and the inner washer (18) for wear. Renew if worn.
 Disassembly of the generator cover
Undo the three stator retaining screws (25) and the two retaining screws (9)
of the two cable grommet bracket (10) from
inside the generator cover.
Remove the stator (2) and the cable grommet br ...
 Overhaul of the flywheel-alternator assembly
Examine the inner part of alternator rotor (24) for signs of damage. Check
that the starter clutch is working properly and
that the needle races do not show signs of wear or damage of any kind. If ...
Other materials:
Symbols
Ducati motor holding s.P.A. Advises you to read this manual
carefully in order to become familiar with your motorcycle. If
in doubt, please contact a ducati dealer or authorised
service centre. The information contained herein will prove
useful on your trips - and ducati motor holding s.P.A. Wis ...
Timing system
Desmodromic (type) with four valves per cylinder,
operated by eight rocker arms (4 opening rockers and 4
closing rockers) and two overhead camshafts. It is operated
by the crankshaft through spur gears, belt rollers and toothed
belts.
Desmodromic timing system (fig. 159)
Opening (or upp ...
Changing the coolant
Warning
This operation must only be carried out when the engine is cold.
Attempting to change the coolant with the engine hot
could lead to burns from hot coolant or scalding steam.
Place a container under the engine and place the motorcycle on its side
stand.
Remove the expansion reserv ...