
Ducati Diavel Service Manual: Renewal of the cooling fan
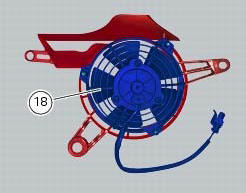
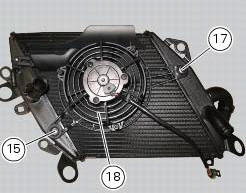
Loosen the electro-fan retaining screws (15) and (17) and remove the electro-fan (18) from the radiator.
Carry out the same procedure for the other radiator's electro-fan.
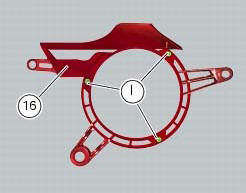
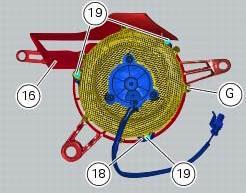
On refitting, position the coolant radiator fan (18) as shown on the fan support (16), so that the three fan holes match the three threaded inserts (i) of the support (16).
Position the grille (g) as shown on the coolant radiator fan (18), threading the fan cable out of the opening in the grille.
Assemble grille (g), fan (18) and fan support (16).
Tighten the screws (19) to a torque of 1 nm +/- 10% (sect. 3 - 3, Frame torque settings).
Tighten screws (15) and (17) to a torque of 5 nm +/- 10% (sect. 3 - 3, Frame torque settings).
 Disassembling the water radiator unit
The procedure is the same for both radiators.
Loosen the screws (15), (21) and (25) to remove the air duct (24) from the right
radiator (13).
Undo the screws (12) and (14) to remove the ...
 Reassembling the water radiator unit
The procedure is the same for both radiators.
Check the presence of clips (1) at the positions of the external coolant
radiator cover (23).
If removed, fit the front turn indicator (32) on the ...
Other materials:
Removal of the generator cover
Note
This operation is described for an engine removed from the frame since all
reassembly procedures are easier with the
engine on the bench.
Disconnect the connector (a) from the generator cable.
Unscrew the two retaining screws (7) of the centre cap (6) over the end of
the cranksh ...
"Parking" function
This function activates the "parkin"h mode.
The "parkin"h function activates the front and rear parking
lights when the vehicle is turned off so it is visible when
parked.
The function is activated by pressing the button (2, fig. 14)
?"´" for 3 seconds du ...
Programming/reprogramming keys
The dds diagnosis instrument is required in order to programme/reprogramme
the keys. The key programming procedure
is launched from this instrument.
To start the key programming/reprogramming procedure it is necessary to have at
least one of the keys that start the
vehicle available (i.E. I ...