
Ducati Diavel Service Manual: Riding style function (riding style change)
This function changes the motorcycle riding style.
Each riding style is associated with a different intervention level of the traction control (dtc - ducati traction control) and different engine power and output.
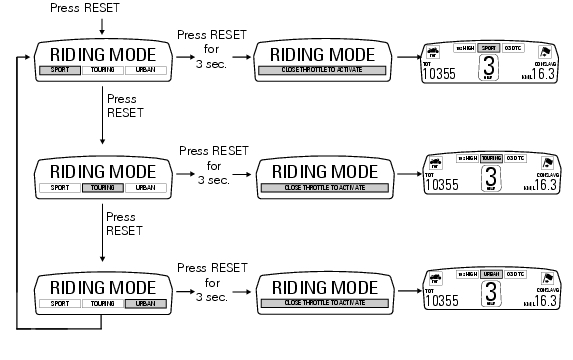
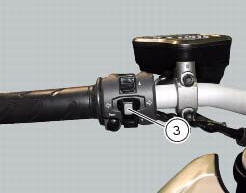
To change the motorcycle riding mode, press the reset button once (3) and the "riding mode" menu will appear on the display.
Select the desired riding mode by pressing the reset button (3) repeatedly. Press the same button for 3 seconds to confirm the riding style.
If the twistgrip is closed (vehicle stopped) the riding style change will occur immediately; if the twistgrip grip is open (vehicle moving) the message "close throttle to activate" will appear on the display, which means that the throttle must be closed; this message will appear for 5 seconds, during which the gas must be closed in order to activate the new riding style.
If the twistgrip is not closed after 5 seconds, the procedure is aborted (no change is made).
If the "riding mode" menu is activated and the reset button (3) is not kept pressed for 10 seconds, the dashboard will automatically exit the display mode without making any change.
Warning
Ducati recommends changing the riding style when the vehicle is stopped. If the riding style is changed while riding, be very careful (it is recommended to change the riding style at a low speed).
 Indication if the lap function is active/not active
This function indicates if "lap" function (lap number) is active.
When "lap" is not lit up, this means that the function has been switched off.
The "lap" function can be activated using the "lap ...
 Maintenance indicator
This function indicates that the vehicle is about to or has travelled a
distance for which an authorised ducati service
centre should be contacted to have the general maintenance or oil change
pe ...
Other materials:
Changing the clutch fluid
Warning
Clutch fluid will damage painted surfaces if spilled on them. It is
also very harmful if it comes into contact with the skin or
with the eyes; in the event of accidental contact wash the affected area with
abundant running water.
Remove cover (1) and membrane from the clutch fluid res ...
Shimming the shafts
Before assembling the crankcase halves, calculate the shims required to
obtain the correct end float of the crankshaft and
gearbox shafts.
To determine the correct shim thickness proceed as follows.
Shimming the crankshaft
After having installed the new main bearings (with bushing (a) or ...
Removal of the evaporative emissions canister
Loosen the screws (9) securing the plate (8) to the tank.
Slightly pull the plate (8) with the canister (13), remove the clamps (3) and
(12) and connect hoses (7) and (14).
Release the retainers (b) of the plate (8) to remove it from the canister
(13).
Disconnect the hose ...