
Ducati Diavel Service Manual: Setting menu
This menu is used to enable/disable and set some motorcycle functions.
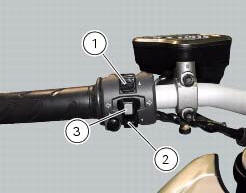
To access the "setting menu" press and hold button (2) "t" for 3 seconds.
Note
When within this menu no other function can be displayed.
Important
For safety reasons, the setting menu can only be accessed when motorcycle speed is lower than or equal to 20 km/h. If this menu is open and the speed of the motorcycle exceeds 20 km/h, the dashboard automatically exits the menu and returns to the "main" display.
The setting menu contains the following "items":
- Riding mode
- Menu 2
- Back light
- Rpm
- Pin code
- Lap
- Battery
- Clock
- Set units
- Abs
- Exit
To quit the setting menu, use button (1) "s" or button (2) "t" to select the "exit" indication and press the reset button (3).

 Dashboard diagnosis
This function identifies any abnormal vehicle behaviours.
The dashboard activates any abnormal vehicle behaviours in real time (errors).
At key-on (at the end of the check) one or more "errors" ...
 Riding mode customisation
This function customises each riding style.
To access the function it is necessary to view the ""setting" menu", using
buttons (1) "s" or (2) "t" select the "riding
mode" function and press the ...
Other materials:
How to use this manual
How to use this manual
This manual has been prepared for technical personnel at ducati authorized
service centres with the aim of providing
fundamental information on how to work in accordance with the modern concepts of
"best practice" and "safety in the
workplace" during the maintenance, re ...
Dtc (ducati traction control) setting function
This function allows you to customise the level of dtc intervention (ducati
traction control) or disable it for every riding
mode.
To access the function it is necessary to view the ""setting" menu", using
buttons (1) "s" or (2) "t" select the "riding
mode" function and press the reset butt ...
The hands free relay
Introduction
This relay provides key on +15 power to all the devices on the motorcycle.
Functionally, it replaces the conventional
ignition switch.
Wiring diagram
The hands free relay receives +12 volt power directly from the battery via
the main 30 a fuse. Hands free - 3: pin 3 on
hand ...