
Ducati Diavel Service Manual: Spark plugs replacement
Check the colour of the ceramic insulation around the central electrode: an even, light brown colour indicates the engine is in good condition and running at the right temperature.
Inspect the centre electrode for wear and check spark plug gap, which should be: 0.8+/-0.1 Mm.
Important
Check the gap between the central and side electrodes. Replace the spark plug if taken value is different from the specified one or the spark plug shows clear signs of carbon settling.
Important
Do not use spark plugs with inadequate thermal rating or incorrect thread length.
The spark plug must be securely installed.
If a spark plug is loose, it can overheat and damage the engine.
Spark plug type
Make: ngk
Type: mar9a-j


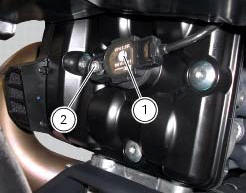
Remove the coil-spark plugs wires (1), loosening the screws (2) of both spark plugs.
Using the appropriate tool 88713.2877 To replace the spark plugs.
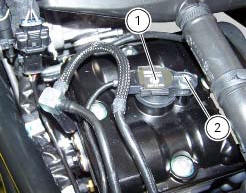

Place the coil-spark plugs wires (1) in the relevant seats and tighten the screws (2) to a torque of 10 nm (min. 9 Nm - max. 11 Nm) (sect. 3 - 3, Engine torque settings).

 Checking valve clearances
To check the valves clearance, it is necessary to have access to the cylinder
head covers and then remove the
components listed below.
Unscrew the two fixing screws (1) of the cover (2) accord ...
 Changing and cleaning the air filters
The air filter must be replaced at the intervals described in the "scheduled
maintenance chart" (sect. 4 - 2).
Work on the vehicle right side, loosen screws (1) that secure the intake duct
(2 ...
Other materials:
Transmission
Wet clutch controlled by the lever on left-hand side of the
handlebar.
Transmission from engine to gearbox primary shaft via spur
gears.
Front chain sprocket/clutch gearwheel ratio:
33/61
6-speed gearbox with constant mesh gears, gear change
pedal on left side of motorcycle.
Gearbox ou ...
Reassembly of the tool tray
Place the tool tray unit (23) on the lateral brackets (2) and (3) by
tightening the screws (24) to 14 nm +/- 5% (sect. 3-3,
Frame torque settings).
If the handle guide (32) has been previously removed, position it on the tray
(23) and tighten the screws (34) to 20 nm
+/- 5% (sect. 3-3, Fram ...
Reassembly of the cylinder head
The exhaust side can be identified by the three threaded holes on the flange.
The intake side can be identified by the presence of four threaded holes on
the flange.
All the photos in this chapter refer to a vertical cylinder head.
Valve guide sealing rings
Position the cylinder head o ...