
Ducati Diavel Service Manual: Steering head: steering
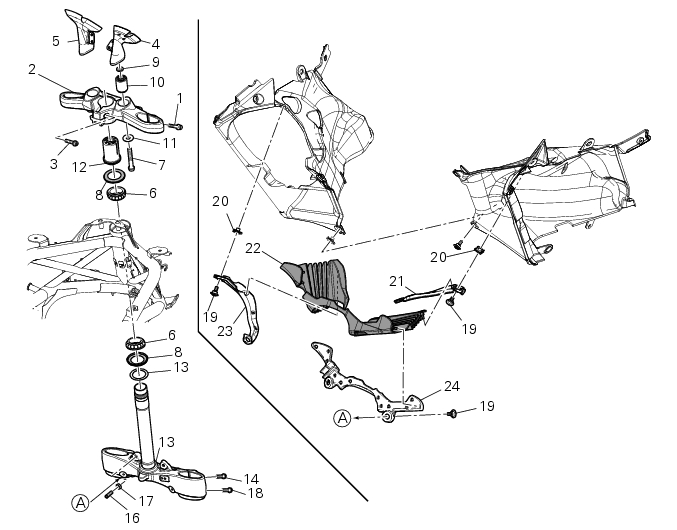
- Screw
- Steering head
- Screw
- Lower rh u-bolt
- Lower lh u-bolt
- Bearing
- Screw
- Sealing ring
- Washer
- Spacer
- Washer
- Nut
- Washer
- Screw
- Bottom yoke
- Dowel
- Nut
- Screw
- Special screw
- Clip nut
- Left-hand support
- Front splashguard
- Right-hand support
- Front support
Spare parts catalogue
Diavel abs handlebar and controls
Diavel abs half fairing
Diavel carbon abs handlebar and controls
Diavel carbon abs half fairing
Important
Bold reference numbers in this section identify parts not shown in the figures alongside the text, but which can be found in the exploded view diagram.
- Adjusting the steering head bearings
- Steering angle adjustment
- Removal of the steering head components
- Refitting the steering head components
 Refitting the front forks
Refit the fork legs, positioning them at the height shown in the figure
relative to the upper surface of the bottom yoke.
Warning
The difference in height between the two fork legs must be no ...
 Adjusting the steering head bearings
Note
To adjust the steering bearing clearance, follow what is described in
sect. 4 - 3, Adjusting the steering head bearings.
If the problems found are not solved, check the wear of steering beari ...
Other materials:
Lcd unit functions
Speedometer.
Gives road speed.
Rev counter.
Indicates engine revs per minute.
Clock.
Water temperature indicator.
Indicates engine coolant temperature.
Important
Stop riding if the temperature reaches the maximum
value, otherwise the engine might be damaged.
...
Removal of the front brake system
Note
For the abs front braking system, also refer to sect. 7 - 5, Abs system
operating information, sect. 7 - 6, System
components, sect. 7 - 7, Abs components maintenance.
Undo the special screw (3), collect the sealing washers (4), and release the
front brake master cylinder assembly (1 ...
Background setting function for the dashboard on tank - dashboard 1
This function allows setting the "background" of the dashboard on tank.
To access the function it is necessary to view the ""setting" menu", using
buttons (1) "s" or (2) "t" select the "back
light" function and press the reset button (3) to enter the following page.
Use button (1) "s" or (2 ...