
Ducati Diavel Service Manual: Swingarm
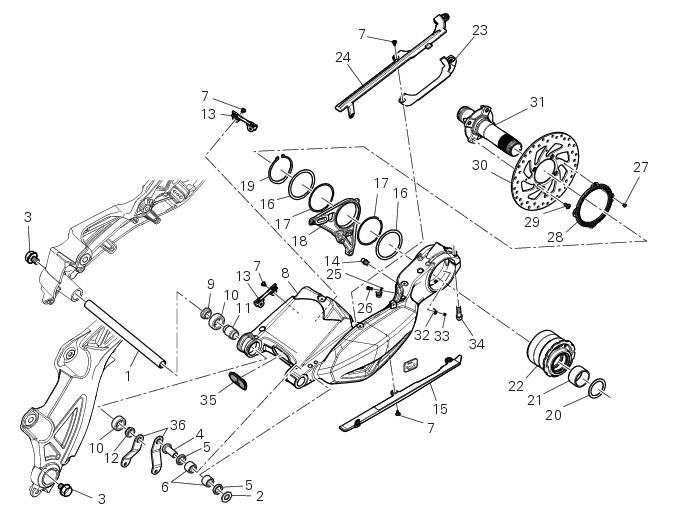
- Swingarm pivot
- Washer
- Special screw
- Bush
- Sealing ring
- Roller bearing
- Special screw
- Rear swingarm
- Spacer
- Bearing
- Spacer
- Spacer
- Hose clip
- Pin
- Chain slider (lower)
- Washer
- O-ring
- Calliper mounting bracket
- Circlip
- Spacer
- Inner ring
- Hub
- Cable grommet
- Chain slider (upper)
- Cable grommet
- Screw
- Screw
- Phonic wheel (rear)
- Screw
- Brake disc (rear)
- Wheel axle (rear)
- Base
- Screw
- Screw
- Plug
- Bracket
Spare parts catalogue
Diavel abs rear wheel axle
Diavel abs swingarm
Diavel carbon abs rear wheel axle
Diavel carbon abs swingarm
Important
Bold reference numbers in this section identify parts not shown in the figures alongside the text, but which can be found in the exploded view diagram.
- Removal of the rear wheel eccentric hub and rear wheel shaft
- Refitting the rear wheel eccentric hub and rear wheel shaft
- Removal of the swingarm
- Overhauling the rear swingarm
- Refitting the swingarm
 Refitting the shock absorber support
If you had removed them, apply recommended grease on the threads of the
adjusters (4) and the ring nuts (3) having
care not to have grease on the surface (c) of the adjusters.
Tighten the adjust ...
 Removal of the rear wheel eccentric hub and rear wheel shaft
Before removing the eccentric hub, you must first remove the parts listed
below.
Slacken off the screws (34).
Remove the spacer (20) and the inner ring (21) on the chain side and remove the ...
Other materials:
Wiring diagram of the hands free system
The diagram illustrates the inputs, outputs and communication lines used by
the hands free system.
1I - on/off button placed on the hands free system (located below the plastic
cover)
2I - on/off button placed on the bike handlebar rh side
3I - steering position micro-switch
4I - steerin ...
Removing the timing belt driveshaft pulleys
Use the tool code 88713.1805 To hold the driving pulley on the engine
crankcase against rotation.
Important
If this operation is carried out with the engine installed in the frame,
hold the driveshaft pulleys against rotation using the
tool code 88713.2011 Mounted on the alternator cover.
Lo ...
Oil pump
Complete oil pump assembly
O-ring
Circlip
O-ring
Pump body
Circlip
Reducer bush
Spring washer
Screw
Screw
Spring washer
Pump drive gear
Key
By-pass plug
Locating bush
By-pass spring
By-pass valve
Spare parts catalogue
Diavel abs filters and oil pump
Diavel ...