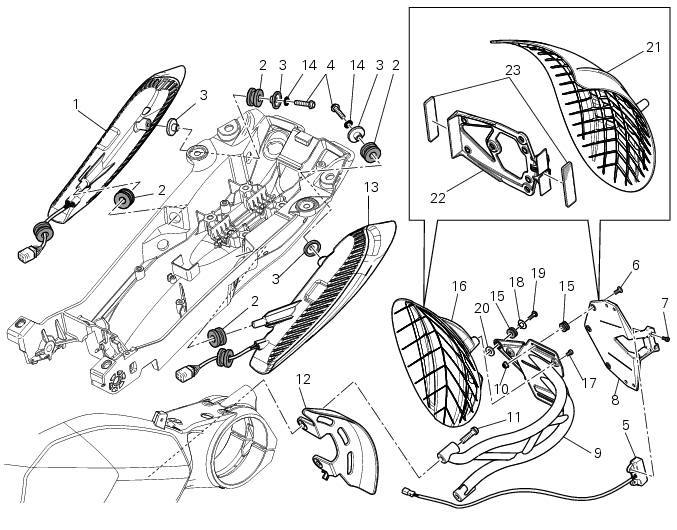
Ducati Diavel Service Manual: Tail light - number plate holder

- Rh tail light
- Vibration damper mount
- Spacer
- Screw
- Number plate light
- Screw
- Screw
- Plate
- Number plate holder
- Nut
- Screw
- Rear chain guard
- Lh tail light
- Spring washer
- Vibration damper mount
- Splashguard
- Screw
- Spacer
- Screw
- Washer
- Splashguard (europe - australia)
- Plate (europe - australia)
- Reflector (europe - australia)
Spare parts catalogue
Diavel abs number plate holder - tail light
Diavel carbon abs number plate holder - tail light
Important
Bold reference numbers in this section identify parts not shown in the figures alongside the text, but which can be found in the exploded view diagram.
- Removal of the licence plate holder
- Refitting the number plate holder
- Removal of the tail light
- Refitting the tail light
 Reassembly of the tool tray
Place the tool tray unit (23) on the lateral brackets (2) and (3) by
tightening the screws (24) to 14 nm +/- 5% (sect. 3-3,
Frame torque settings).
If the handle guide (32) has been previously r ...
 Removal of the licence plate holder
Disconnect connector (5) of the number plate holder wiring from the main one.
Release the number plate holder light cable from the ties and the cable grommets
as indicated in sect- 7 - 6, fle ...
Other materials:
Specific tools for the frame
88713.1072 Drift to install half bearing in bottom yoke
88713.2562 Chain assembly tool
88713.1058 Wrench for steering shaft nut
88713.1062 Tool for installing steering head bearings
88713.2951 Rear wheel balancing tool
88713.3211 Wrench for adjustment of the eccentric hu ...
Adjusting the rear shock absorber
The rear shock absorber has external commands that enable
you to adjust the setting to suit the load on the motorcycle.
The adjuster (1, fig. 111) Located on the lower connection
holding the shock absorber to the swingarm adjusts the
damping during the rebound phase (return).
The knob (2, f ...
Refitting the front wheel
When all the necessary inspections have been completed, refit the wheel as
follows.
Fit the spacers (3) and (9) to the seal rings on the sides of the wheel hub.
Install the complete wheel between the fork legs.
Lubricate the shank and thread of the wheel axle (10).
Take the pin ...