
Ducati Diavel Owners Manual: Tank filler plug
 Note
Note
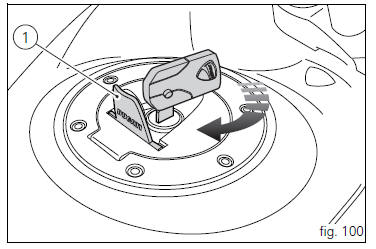
To open or close the tank filler plug using the active key, set the metal part in the middle position, as shown on page 86.
Opening
Lift the cover (1, fig. 100) And insert the active or passive key into the lock. Give the key a 1/4 turn clockwise to unlock.
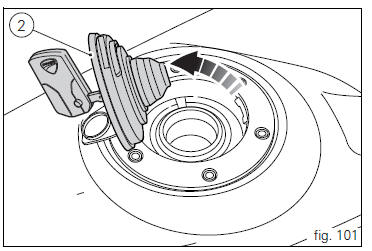
Lift the plug (2, fig. 101).
Closing
Close the cap (2, fig. 101) With the key inserted and press it into its seat. Remove the key and replace the lock cover (1, fig. 100).
 Note
Note
The cap can only be closed with the key inserted.
 Warning
Always make sure you have properly refitted (see page 140) and closed the plug after each refuelling.
Seat lock
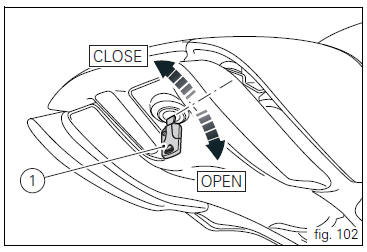
Work latch (1, fig. 102) To remove the seat and access to the underseat compartment and any other device under it.
 Position on the vehicle
Tank filler plug.
Seat lock.
Side stand.
Rear-view mirrors.
Front fork adjusters.
Rear shock absorber adjusters.
Catalytic converter.
Exhaust silencer (see "warning" on ...
 Side stand
Insert the active or passive key in the lock (1, fig. 102), Turn it
clockwise and simultaneously apply downward pressure in
the area of the catch to release the pin. Pull the seat
backwards to rele ...
Other materials:
Specific operating strategies
Idle speed
No electric motor is used for idle speed regulation (bypass is modulated
instead with the throttle valve), as idle speed
control is effected by the ride-by-wire system. Idle speed is maintained by the
control unit when the speed drops below a
specific threshold and when the clutch ...
General safety rules
Carbon monoxide
When a maintenance operation must be performed with the engine running, maker
sure that the working area is wellventilated.
Never run the engine in an enclosed space.
Warning
Exhaust fumes contain carbon monoxide, which is a poisonous gas that
can cause unconsciousness or e ...
Dashboard
Note
The dashboard is supplied as a single component; its internal components
cannot be renewed separately.
Important
Whenever the dashboard is renewed, the ignition key programming procedure
must be repeated.
Loosen the nuts (2) to remove the master dashboard (1) from its seat and
disconn ...