
Ducati Diavel Owners Manual: Units of measurement modification function
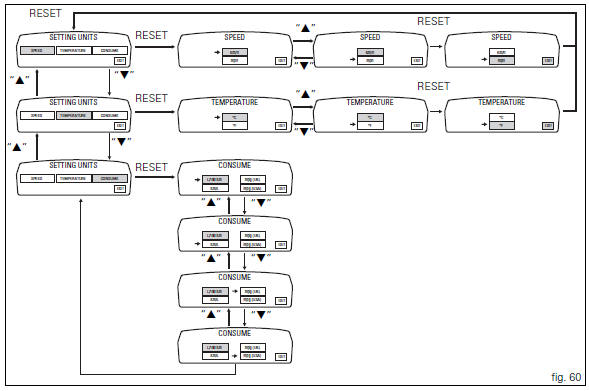
This function allows you to change the units of measurement of the displayed values.
To access the function it is necessary to view the "setting" menu page 48, using
button (1, fig. 14) ?" " or (2, fig.
14) ?" " select the "set units" function
and press the reset
button (12, fig. 12) To go to next page.
Use button (1, fig. 14) ?" " or (2,
fig. 14) ?" " to select the
value relative to the unit of measurement to be changed and
press the reset button again (12, fig. 12).
The instrument panel displays the values that can be modified; use button (1,
fig. 14) ?" " or (2, fig. 14) ?"
 " to
select the value to modify and press the reset button (12, fig.
12) Again.

"Speed" setting
This function allows to change the units of measurement of speed (and hence even the ones of distance travelled).
Currently set unit of measurement is highlighted in green on the display; use
button (1, fig. 14) ?" " or (2, fig.
14) ?" " to
shift the arrow on the left onto the new setting and confirm
by pressing the reset button (12, fig. 12).
Save the setting and, when coming back to main screen, any new unit of measurement set will be present.
- Km/h: by setting this condition the following values will have the same units of measurement:
- Tot, trip1, trip2, trip fuel: km
- Vehicle speed and average speed (speed avg): km/h
- Mph: by setting this condition the following values will have the same units of measurement:
- Tot, trip1, trip2, trip fuel: miles
- Vehicle speed and average speed (speed avg): mph.
To exit the setting function, press the reset button (12, fig.
12) Where "exit" is highlighted.
"Temperature" setting
This function allows you to change the units of measurement of the temperature.
Currently set unit of measurement is highlighted in green on the display; use
button (1, fig. 14) ?" " or (2, fig.
14) ?" " to
shift the arrow on the left onto the new setting and confirm
by pressing the reset button (12, fig. 12).
Save the setting and, when coming back to main screen, any new unit of measurement set will be present
- C: by setting this condition the following values will have the same units of measurement:
- Engine coolant temperature and t_air: C
- F: by setting this condition the following values will have the same units of measurement:
- Engine coolant temperature and t_air: f
To exit the setting function, press the reset button (12, fig.
12) Where "exit" is highlighted.
Consume setting
This function allows to change the units of measurement of the average and instantaneous fuel consumption.
Currently set unit of measurement is highlighted in green on the display; use
button (1, fig. 14) ?"
" or (2, fig. 14) ?" " to
shift the arrow on the left onto the new setting and confirm
by pressing the reset button (12, fig. 12).
Save the setting and, when coming back to main screen, any new unit of measurement set will be present.
- Km/l: by setting this condition the following values will have the same units of measurement:
- Cons. And cons. Avg: km/l
- L/100: by setting this condition the following values will have the same units of measurement:
- Cons. And cons. Avg: l/100
- Uk mpg: by setting this condition the following values will have the same units of measurement:
- Cons. And cons. Avg: uk mpg
- Usa mpg: by setting this condition the following values will have the same units of measurement:
- Cons. And cons. Avg: usa mpg
To exit the setting function, press the reset button (12, fig.
12) Where "exit" is highlighted.
 Clock setting function
This function sets the clock.
To access the function it is necessary to view the "setting" menu page 48, using
button (1, fig. 14) ?"
"or (2, fig. 14) ?""select th ...
 Abs disabling function
This function disables or enables the abs.
To access the function it is necessary to view the "setting" menu page 48, using
button (1, fig. 14) ?"
" or (2, fig. 14) ?"& ...
Other materials:
Refitting the camshafts
If the stud bolts (2) were removed, apply the recommended threadlocker to the
short end of the stud bolts (2), i.E. The
end that is to be screwed into the cylinder head. Tighten the stud bolts (2) to
a torque of 10 nm (min. 9 Nm - max. 11
Nm) (sect. 3 - 3, Engine torque settings).
Check t ...
Stored lap display function
This function displays the stored laps.
To access the function it is necessary to view the "setting" menu page 48, using
button (1, fig. 14) ?"" or (2, fig.
14) ?" " select the "lap" function and
press the reset button
(12, fig. 12) To go to next pag ...
Reassembly of the timing pulleys
Fit the pulley (11) on the flange (24), aligning the timing mark (d) on the
pulley with the timing mark on the (e) on the
flange.
Install the washer (23) up against the pulley, aligning the timing notch (f)
with the timing marks on the pulley and the
flange.
Insert the three screws (22) ...