
Ducati Diavel Service Manual: Warning indication (alarms/signals)
The dashboard activates in real-time some warnings / malfunction that are not dangerous for the correct operation of the vehicle.
At key-on (at the end of the check) one or more "warnings" are displayed if they are active.
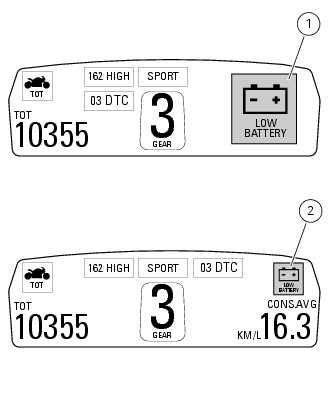
When a "warning" is triggered, the indication (amber yellow) remains well visible (1) for 10 seconds then becomes smaller (2).
If there are multiple indicators, they will scroll automatically every 3 seconds.
Note
No signal lights turn on if one or more "warnings" are activated.
The following "warnings" could be displayed: "low" battery level (low battery); traction control "deactivated" (dtc off); hands free key (hf) "not recognised"; "low" hands free key (hf) battery level; "high" engine coolant temperature (high temp); steering release error - steering still locked (unlock error).
With one or more "warnings" active, the user may access other functions by pushing button (2) "t".
 Indication of range reached for service
When service coupon threshold is achieved, upon every key-on the system
displays the indication of the type of
intervention that is required (oil service or desmo service).
The (red) warning is ...
 Low battery level
The activation of this (amber yellow) "warning" indicates that the status of
the battery vehicle is low.
It is activated when the battery voltage is ¼ 11.0 Volt.
Note
In this case, ducati ...
Other materials:
Digital rpm indication function
This function displays the number of rpms for improved accuracy when setting
idle rpm.
To access the function it is necessary to view the ""setting" menu", using
buttons (1) "s" or (2) "t" select the "rpm"
function and press the reset button (3) to confirm.
The display shows the numerical v ...
Tester power supply
The dds (1) part number 97900.0215 Can be powered from the vehicle as
follows:
From the mains power supply: by connecting the power supply connector
(n) to the network power supply (2) part no.
97900.0224;
From the motorcycle: connecting the corresponding cables (see paragraph
...
Replacing the front phonic wheel sensor
Disconnect the front abs sensor (2) connector (a) from the main electric
wiring.
Open all the retainer clamps of the front abs sensor cable (2): refer to table
of sect. 7 - 6, Flexible wiring/hoses
positioning.
Loosen retaining screw (1) and remove the front abs sensor (2) with
ca ...