
Ducati Diavel Service Manual: Water pump
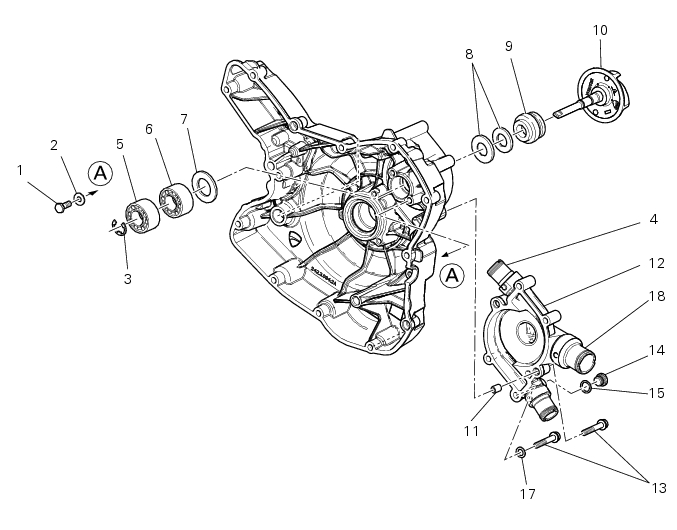
- Screw
- Washer
- Circlip
- Water pump outlet union
- Bearing
- bearing
- Spacer
- Aluminium gasket
- Mechanical seal
- Water pump impeller
- Bush
- Water pump cover assembly
- Screw
- Plug
- Sealing washer
- Generator cover
- Special washer
- Fuel filler flange
Spare parts catalogue
Diavel abs water pump-altr-side crankcase cover
Diavel carbon abs water pump-altr-side crankcase cover
Important
Bold reference numbers in this section identify parts not shown in the figures alongside the text, but which can be found in the exploded view diagram.
 Refitting the radiator
The reassembly procedure is the same for both radiators.
Check for the nuts with clips (8).
Refit the rh radiator (13) on the frame and tighten the screws (4) and (5)
with the spacers (6) to ...
 Removal of the water pump
Note
For clarity, the figures show the engine removed from the frame.
Loosen and remove the water pump cover (12) fixing screws (13) to the
generator cover (16).
Remove the water pump cover ...
Other materials:
Alternator
It is equipped with a 12 v, 430 w generator, consisting of a fixed element
(stator, a) located on the generator cover and
of a movable element (rotor, b) fixed to the crankshaft.
Note
To check the battery charging system for faults, use the dds diagnosis
instrument and follow the instruct ...
Removing the valve rocker arms
With the cylinder head in the condition described in the previous paragraph,
remove the rocker arms.
Unscrew the eight plugs (12) and recover the seals (15).
Using an m6 screw, withdraw the shafts (2) of the opening rocker arms (3) on
the exhaust and intake sides.
Remove the openi ...
Radiator fan relay
Introduction
The radiator fans are powered via a specific relay, which is enabled by the
engine control unit.
Component assembling position
A injection relay; b etv relay (throttle valve actuator motor), c radiator
fan relay, d engine control unit.
Location of right hand fan connecti ...