
Ducati Diavel Service Manual: Fairings
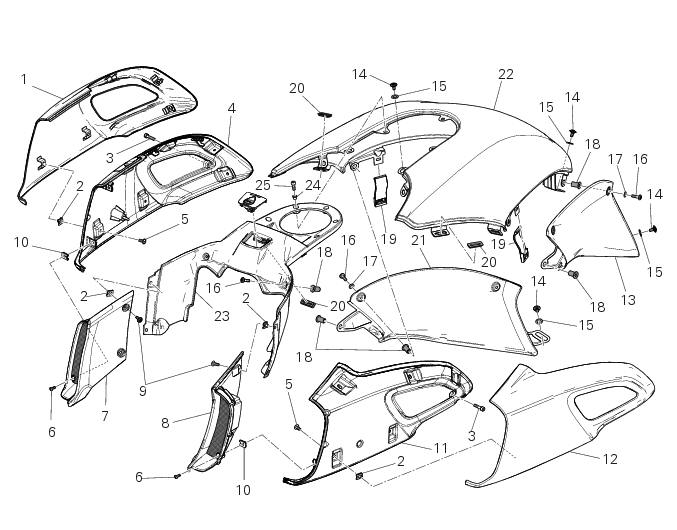
- Rh front half-fairing
- Clip
- Screw
- Right-hand support
- Screw
- Screw
- Rh air inlet
- Lh air inlet
- Screw
- Clip
- Left-hand support
- Lh front half-fairing
- Lh tank fairing
- Screw
- Nylon washer
- Special screw
- Washer
- Spacer
- Spring
- Rubber pad
- Rh tank fairing
- Tank fairing
- Tank plug cover
- Spacer
- Screw
Spare parts catalogue
Diavel abs fairing
Diavel carbon abs fairing
Important
Bold reference numbers in this section identify parts not shown in the figures alongside the text, but which can be found in the exploded view diagram.
- Removal of the fuel tank fairings
- Disassembly of the front half-fairings
- Reassembly of the front half-fairings
- Refitting the fuel tank fairings
 Refitting the rear-view mirrors
Start the screws (2) in their thread on the rear-view mirrors (1), inserting
the washers (4) as shown in the picture.
Insert the rear-view mirrors (1) in the u-bolts (3).
Tighten the screws ...
 Removal of the fuel tank fairings
Remove the rh air inlet (7) by loosening screws (6) and (9).
Undo the retaining screw (3) of the rh front half-fairing (1).
Slightly pull the pin (a) to disengage it from the seal (b), a ...
Other materials:
Abs diagnosis
Note
The on-screen icons used during this procedure are explained in a table at
the end of this section.
If the abs system is not working correctly, system diagnosis is possible
through the dds diagnosis instrument.
Turn on the dds diagnosis instrument (1) referring to the paragraph "tester ...
Adjusting the position of the gearchange and rear brake
pedals
The position of the gearchange and rear brake pedals in
relation to the footrests can be adjusted to suit the
requirements of the rider.
Adjust the pedals as follows:
Gear change pedal (fig. 97)
Hold the linkage (1) and slacken the lock nuts (2) and (3).
Note
Nut (2) has a left-hand thr ...
Injection relay
Introduction
The fuel pump, injectors and ignition coils are all powered via the injection
relay. The relay also sends voltage to the
engine control unit, which enables activation of the relay itself.
Component assembling position
A injection relay; b etv relay (throttle valve actuator mot ...