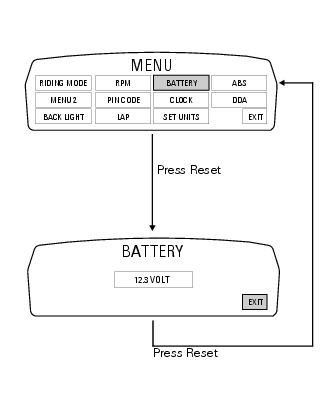
Ducati Diavel Service Manual: Battery voltage indicator (battery)
This function describes the battery voltage indicator.
To access the function it is necessary to view the ""setting" menu", using buttons (1) "s" or (2) "t" select the "battery" function and press the reset button (3) to confirm.
The information will be displayed as follows: if battery voltage is between 11.8 And 14.9 Volt the reading will be displayed steady; if battery voltage is between 11.0 And 11.7 Volt the reading will be displayed flashing; if battery voltage is between 15.0 And 16.0 Volt the reading will be displayed flashing; if battery voltage is equal to or less than 10.9 Volt, "low" is shown flashing and the "vehicle/engine diagnosis - eobd" light comes on; if battery voltage is equal to or higher than 16.1 Volt, "high" is shown flashing and the "vehicle/engine diagnosis - eobd" light comes on;
Note
Dashes "- - -" appear if the reading is not available.

 Stored lap erase function
This function erases the stored laps.
To access the function it is necessary to view the "setting" menu", using
buttons (1) "s" or (2) "t" select the "lap"
function and press the reset button (3 ...
 Clock setting function
This function sets the clock.
To access the function it is necessary to view the ""setting" menu", using
buttons (1) "s" or (2) "t" select the "clock"
function and press the reset button (3) to ...
Other materials:
Resetting turn indicators not possible - accessing dashboard menu not
possible
Fault codes
Dds: no fault code displayed
Dashboard: no fault code displayed
Location of connections and components
Location of left hand handlebar switchgear set connection.
Pin numbering for wiring harness side dashboard connector.
Checks
Test turn indicator reset button function. Wh ...
Reassembly of the tool tray
Place the tool tray unit (23) on the lateral brackets (2) and (3) by
tightening the screws (24) to 14 nm +/- 5% (sect. 3-3,
Frame torque settings).
If the handle guide (32) has been previously removed, position it on the tray
(23) and tighten the screws (34) to 20 nm
+/- 5% (sect. 3-3, Fram ...
Solenoid starter
Remove the protection cover (a).
Undo the screws (2), taking care to collect the spring washers (3).
Remove the starter motor-solenoid cable (4) and the solenoid-battery cable (5).
Remove the starter solenoid (1) sliding it upwards.
Checking operation of the starter solenoid
To ...