
Ducati Diavel Service Manual: Changing the clutch fluid
Warning
Clutch fluid will damage painted surfaces if spilled on them. It is also very harmful if it comes into contact with the skin or with the eyes; in the event of accidental contact wash the affected area with abundant running water.
Remove cover (1) and membrane from the clutch fluid reservoir (2) by loosening the screws (3).
Siphon off the fluid from the reservoir (2).
Fill the tank (2) with new oil up to the max. Mark.

Operate the clutch lever two or three times until the circuit is pressurised.
Hold the lever pulled in towards the grip.
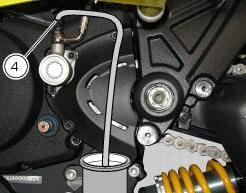
Attach a length of transparent plastic tubing to the bleed valve (4) and insert the other end of the tubing in a container Placed on the floor.
Open the bleed valve (4) to allow fluid to escape.
Warning
During the filling operation, always keep the oil level above the min mark to prevent the formation of air bubbles in the circuit.
Allow the fluid to flow from the bleed valve (4) until it changes colour. Retighten the bleed valve (4) and tighten to a torque of 4 nm +/-10% (sect. 3 - 3, Frame torque settings) and restore the correct level of oil in the tank.
 Changing the brake fluid
Warning
Brake fluid is corrosive and will damage paintwork. Avoid contact
with eyes and skin. In the case of accidental contact,
wash the affected area thoroughly with plenty of running water.
Ch ...
 Draining the clutch hydraulic circuit
Warning
Clutch fluid will damage painted surfaces if spilled on them. It is
also very harmful if it comes into contact with the skin or
with the eyes; in the case of accidental contact, wash the a ...
Other materials:
Removal of the water pump
Note
For clarity, the figures show the engine removed from the frame.
Loosen and remove the water pump cover (12) fixing screws (13) to the
generator cover (16).
Remove the water pump cover (12).
Clean the pump housing of any scale. Check the bearings wear by turning the
impeller s ...
Suspensions
Front
Hydraulic upside-down fork provided with external adjusters
for rebound and compression damping and preload (for inner
springs of fork legs).
Stanchion diameter:
50 mm, coated.
Rear wheel travel:
120 mm
Rear
The shock absorber is adjustable for rebound and
compression, with remot ...
Refitting the front brake master cylinder
Insert the front brake master cylinder unit (1) on the right side of the
handlebar to bring the terminal internal edge in
correspondence to the bolted joints (a).
Fit the terminal (12) on the handlebar inserting the screws (15).
Tighten the terminal (12) retaining screws to a torque of 10 ...