
Ducati Diavel Service Manual: Removal of the rear wheel eccentric hub and rear wheel shaft
Before removing the eccentric hub, you must first remove the parts listed below.
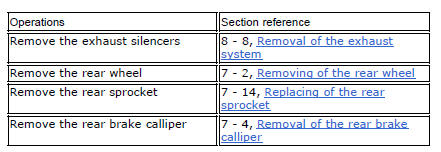
Slacken off the screws (34).
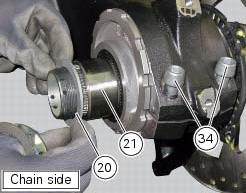
Remove the spacer (20) and the inner ring (21) on the chain side and remove the wheel shaft (31) with the brake disc (30) from the opposite side.
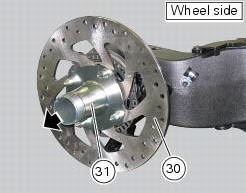
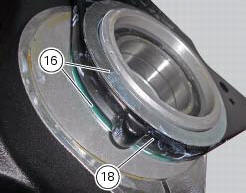
Remove the circlip (19) on the wheel side of the eccentric hub.
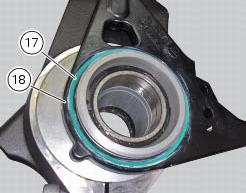
Remove washers (16), the o-ring (17) and the calliper holding plate (18) with the other o-ring (17).
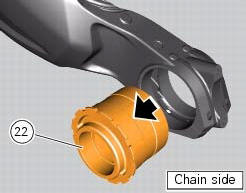
Withdraw the eccentric hub (22) from the chain side of the swingarm.
Note
The rear hub is a component particularly critical to the dynamic safety of the motorcycle; under no circumstances may the internal components of the hub be serviced or repaired. The hub may be ordered as a complete assembly, spare part no. 756.2.013.1A.
 Swingarm
Swingarm pivot
Washer
Special screw
Bush
Sealing ring
Roller bearing
Special screw
Rear swingarm
Spacer
Bearing
Spacer
Spacer
Hose clip
Pin
Chain slider (lower)
Wa ...
 Refitting the rear wheel eccentric hub and rear wheel shaft
Refitting is the reverse of removal, with attention to the following points.
If the calliper bracket locating pin (14) was removed, apply the recommended
threadlocker on reassembly.
Tighten th ...
Other materials:
Removal of the front mudguard
Undo the screw (7) and remove the front brake lines (a) from the hose grommet
(4).
Undo and remove the special retaining screws (5): keep the spacers (6).
Remove the front mudguard (1).
Warning
The version provided with carbon mudguards features nylon washers
instead of the spacers (6) ...
Refitting the rear mudguard
Place the rear mudguard (8) on the swingarm, fitting the screws (9) with
recommended threadlocker.
The screw (9) in the bottom hole of the rear mudguard (8) must be installed with
the washer (r).
Tighten the screws (9) to a torque of 5 nm +/- 10% (sect. 3 - 3, Frame torque
settings).
...
Abs system operating information
The response of the system is based on the analysis of the speed signals for
front and rear wheels; the system is
automatically deactivated if either of these signals is missing.
Note
In the event of the abs control unit detecting a fault in the abs
electronic management system, it activates ...