
Ducati Diavel Owners Manual: Residual range indication when the service is due
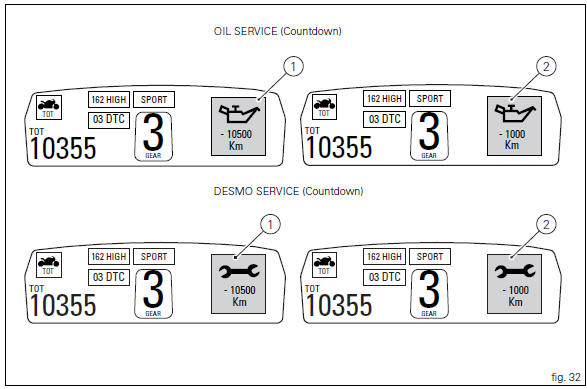
After resetting the first oil service warning (triggered at 1000 km), upon every key-on the system displays the indication of which type of service should be performed next (oil service or desmo service) and the residual range.
A (green) warning (1, fig. 32) Is activated for 2 seconds on every key-on; while 1000 km before the threshold an (amber yellow) warning (2, fig. 32) Is activated for 5 seconds upon every key-on.
 Warning
This message can only be reset by the ducati dealer or authorised service centre that performs the maintenance.
 Maintenance indicator
This function indicates that the vehicle is about to or has
travelled a distance for which an authorised ducati service
centre should be contacted to have the general maintenance
or oil change perf ...
 Indication of range reached for service
When service coupon threshold is achieved, upon every key-
on the system displays the indication of the type of
intervention that is required (oil service or desmo
service).
The (red) warning is ...
Other materials:
Checking the frame
Check the dimensions of the frame against the dimensions shown here to
determine whether it needs to be realigned or
renewed.
Important
Damaged frames must be changed, not repaired. Any work carried out on the
frame can give rise to potential danger,
infringing the requirements of ec directi ...
Stop light not working
Fault codes
Dds: stop light diagnosis -> stop light error (generic stop light malfunction
indication).
Dashboard: the error "stop light" is shown on the service display. The eobd
warning light activates.
Wiring diagram
Db dashboard connection, bbs bbs unit connection, a front brake ...
Adjusting the chain tension
Make the rear wheel turn until you find the position where chain is tightest.
Set the vehicle on the side stand. Push down
the chain at the point of measurement and release. Measure the distance between
the "aperture" upper profile and pin
centre.
The read distance must be: 9 to 11 mm.
...