
Ducati Diavel Owners Manual: Stored lap erase function
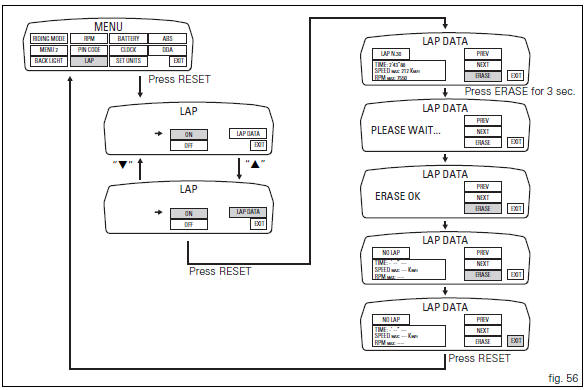
This function erases the stored laps.
To access the function it is necessary to view the "setting" menu page 48, using
button (1, fig. 14) ?" " or (2, fig.
14) ?" " select the "lap" function and
press the reset button
(12, fig. 12) To go to next page.
Use button (1, fig. 14) ?" " or (2,
fig. 14) ?" " to select "lap
data" indication and press the reset button again (12, fig.
12) To enter the page showing the previously recorded lap times.
Highlight the "erase" item, use button (1, fig. 14) ?" "
"
or (2, fig. 14) ?" " to scroll through
the stored laps to erase and
press the reset button (12, fig. 12) For 3 seconds. Now, on
the left-hand side of the display you have "please wait..."
and then, to confirm deletion, "erase ok" appears for 2
seconds.
You will notice that no stored data will be present any more and "no lap" message will be displayed.
To exit, select "exit" and press the reset button (12, fig. 12).
 Stored lap display function
This function displays the stored laps.
To access the function it is necessary to view the "setting" menu page 48, using
button (1, fig. 14) ?"" or (2, fig.
14) ?" &quo ...
 Battery voltage indicator (battery)
This function describes the battery voltage indicator.
To access the function it is necessary to view the "setting" menu page 48, using
button (1, fig. 14) ?"" or (2, fig.
1 ...
Other materials:
Setting menu
This menu is used to enable/disable and set some motorcycle functions.
To access the "setting menu" press and hold button (2) "t" for 3 seconds.
Note
When within this menu no other function can be displayed.
Important
For safety reasons, the setting menu can only be accessed when motorcycle
...
Reassembly of the gearbox shafts
Figure 1 shows all the parts to be reassembled on the gearbox primary shaft
(2), with the calculated end shims (1) and
(11) (sec. 9 - 9.2, Reassembly of the crankcase halves).
Figure 2 shows all the parts to be installed on the gearbox secondary shaft
(25), with calculated end shims (15) a ...
Oxygen sensors
Introduction
An on-off type oxygen sensor (in normal operating conditions, the voltage
generated by the sensors switches between a
value close to 1v and a value close to 0v) is mounted on each of the exhaust
manifold of the diavel.
Each oxygen sensor has its own internal heater, which recei ...