
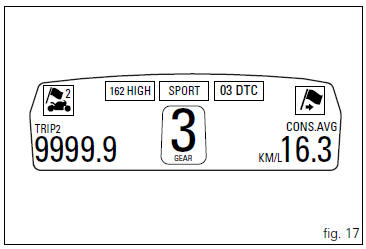
Ducati Diavel Owners Manual: Trip 2 meter
This function shows the distance travelled since the trip meter was last reset (in km or miles depending on the specific application).
Holding the button (1, fig. 14) ?
pressed for 3 seconds
when this function is displayed resets the trip meter.
When the reading exceeds 9999.9, Distance travelled is reset and the meter automatically starts counting from 0 again.
If the system measurement units are changed at any moment through the "set units" function of the setting menu, or if there is an interruption in the power supply (battery off), the distance travelled is reset and the count starts from zero (considering the newly set unit of measurement).
 Trip 1 meter
This function shows the distance travelled since the trip
meter was last reset (in km or miles depending on the
specific application).
Holding the button (1, fig. 14)
pressed for 3 seconds
wh ...
 Distance travelled on fuel reserve: trip fuel
This function shows the distance travelled on fuel reserve (in
km or miles depending on the specific application).
When the fuel light comes on, the display automatically
switches to the "tr ...
Other materials:
Refitting the rear footrests
Note
The refitting of the rear footrests is described for the right side but it
is the same for both.
If previously removed, refit the rubber footrest (11) on the rear rh footrest
(6), by pushing it until pad (b) engages in the
other side.
Note
The rubber footrest (11) side featuring the le ...
Adjusting the clutch lever and front brake lever
The clutch lever (1) is fitted with a span adjuster (2) which serves to alter
the distance of the lever from the handlebar.
The lever distance can be adjusted through 10 clicks of the dial (2). Turn
clockwise to increase lever distance. Turn the
adjuster counter clockwise to decrease lever d ...
Replacing the high and low beam bulbs
Before replacing a burnt-out bulb, make sure that the new
bulb complies with the voltage and wattage specified in the
"wiring diagram", page 179. Always test the new bulb
before refitting any parts you have removed.
Fig. 150 Shows the locations of the low beam bulbs (lo), high
beam ...