
Ducati Diavel Service Manual: How to turn the motorcycle off
To turn the motorcycle off, turn the switch from "run on" to "run off". The engine stops. To switch the dashboard off, push the on/off switch downwards. When released, the switch automatically returns to the "run off" position.
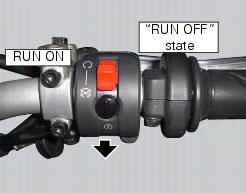
Push the switch downwards to switch the engine off and enter "run off" state.
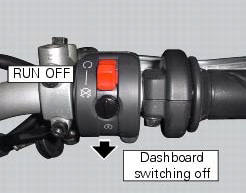
Push the switch downwards to switch off the dashboard. The dashboard can only be switched off if the vehicle is stationary (speed = 0 km/h).
If the vehicle is still in motion, the dashboard remains on (for example, if the motorcycle is coasting downhill with the engine off).
To force dashboard power off, even with the vehicle in motion, press the on/off button on the hands free module once.
After the dashboard is switched off, the system remains active for 60 seconds awaiting a request to engage the steering lock or open the electric fuel tank cap (optional).
How to engage and disengage the steering lock
The steering lock may be engaged within 60 seconds of switching the dashboard off. If more than 60 seconds have elapsed since switching the dashboard off, the dashboard must be switched on and off again (the key must be detected and recognised).
Turn the handlebar completely to the left or right. Push the on/off switch on the handlebar downward or press the button on the hands free system; the steering lock audibly engages.
If, for any reason, the steering lock does not work correctly, the lock pin is automatically retracted (and the steering lock disengaged) after a few seconds.
To disengage the steering lock, simply push the on/off switch on the handlebar downward or press the button on the hands free system with the key within operating range. The dashboard switches on and the steering lock is automatically disengaged.
When the vehicle is switched off (engine and dashboard) and with the handlebar
positioned correctly for steering lock
activation (turned fully right or fully left), the following icon is shown on
the dashboard for 5 seconds to indicate that the
steering lock may be disengaged. To engage the steering lock, simply push the
on/off switch on the handlebar downward
or press the button on the hands free system.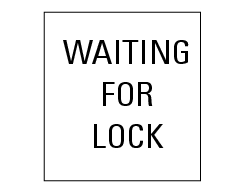
The following image shows the icon appearing on the tank dashboard: this indicates that the steering is correctly positioned for activating the steering lock.
When the steering lock is engaged, the following icon is shown on the display
for 5 seconds: 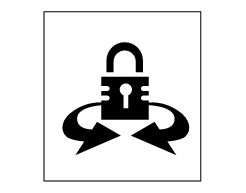
The following image shows the icon appearing on the tank dashboard: this indicates that the steering lock has been engaged.
Warning
The steering lock cannot be engaged or disengaged if the vehicle battery is flat. In this case, replace the vehicle battery or connect an external battery using jump leads.
How to open the electric fuel tank cap (optional) the electric fuel tank cap may be opened within 60 seconds of switching off the dashboard. If more than 60 seconds have elapsed since switching the dashboard off, the dashboard must be switched on and off again (the key must be detected and recognised).
Note
Once the steering lock is engaged it will no longer be possible to open the filler plug provided with electronic lock (optional). To open the filler plug it will be necessary to switch on and off the dashboard (the key must be present and acknowledged) without engaging the steering lock.
Recovery and emergency procedures
The following are the recovery procedures implemented by the hands free system in the event of malfunction or fault and the emergency procedures to be used if, for example, a key is lost or does not work.
 How to start the motorcycle without keys
To start the motorcycle when necessary with no active or passive key, switch
the dashboard on by pressing the button on
the hands free system (located under the plastic shield at the front of the
...
 Recovery procedure with no key
When the dashboard is on and the key has been recognised, the hands free
attempts to detect the key every 60 seconds.
If the engine is off and the on/off switch on the handlebar is turned to "run ...
Other materials:
Evaporative emissions canister
Sealing washer
Union
Hose clip
Hose
Clamp
"T" fitting
Hose
Support
Special screw
Rubber mounting
Hose
Hose clip
Evaporative emissions canister
Hose
Spring
Spare parts catalogue
Diavel abs evaporative emissions canister
Diavel carbon
abs
evaporative emissions ...
Stop light not working
Fault codes
Dds: stop light diagnosis -> stop light error (generic stop light malfunction
indication).
Dashboard: the error "stop light" is shown on the service display. The eobd
warning light activates.
Wiring diagram
Db dashboard connection, bbs bbs unit connection, a front brake ...
Operating principle
Introduction
The hands free system features two separate on/off buttons, either one of
which may be used as preferred by the rider.
For practical reasons, we recommend using the button on the handlebar rather
than the button located underneath the
plastic shield covering the hands free syst ...