
Ducati Diavel Owners Manual: Cleaning and replacing the spark plugs
Spark plugs are essential to smooth engine running and should be checked at regular intervals.
The condition of the spark plugs provides a good indication of how well the engine is running.
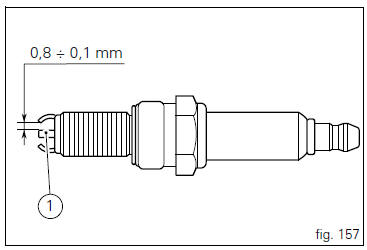
Have the spark plugs inspected or replaced at a ducati dealer or authorised service centre; they will check the colour of the ceramic insulator of the central electrode (1): an even brown colour is a sign that the engine is in good running order.
 Note
Note
Inspect the centre electrode for wear and check spark plug gap, which should be: 0.8×0.1 Mm.
 Important
A gap outside the specified limits will adversely affect engine performance and may lead to difficult starting or erratic idling.
 Checking engine oil level
Check the engine oil level through the sight glass (1) on the
clutch cover. When checking oil level, the motorcycle should
be perfectly upright and the engine cold. The oil level should
be between ...
 General cleaning
To preserve the finish of metal parts and paintwork, wash
and clean your motorcycle at regular intervals, anyway
according to the road conditions you ride in. Use specific
products, where possible ...
Other materials:
Running-in recommendations
Maximum rpm (fig. 114)
Rotation speed for running-in period and during standard use
(rpm)
Up to 1000 km;
From 1000 to 2500 km.
Up to 1000 km
During the first 1000 km, keep an eye on the rev counter.
It should never exceed
5500÷6000 rpm.
During the first hours of riding, it ...
Air intake
Air filter
Right air duct
Screw
Air temperature sensor
Screw
Left air duct
Sealing washer
Threaded insert
Spacer
Clamp
Breather hose
Spare parts catalogue
Diavel abs air intake - oil breather
Diavel carbon
abs
air intake - oil breather
Important
Bold reference num ...
Headlight aim
The motorcycle must be perfectly upright with the tires inflated to the
correct pressure and with a rider seated, perfectly
perpendicular to the longitudinal axis.
Position the motorcycle 10 metres from a wall or a screen.
On the wall or surface, draw a horizontal line at the same height fr ...