
Ducati Diavel Service Manual: Passive key
Introduction
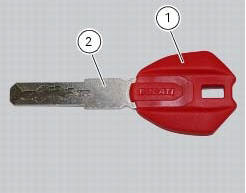
The passive key (1) is used when the active key is not working correctly or is not available.
The passive key works as a transponder, and must therefore be placed physically onto the antenna to work.
The mechanical part (2) of the key is used to open the seat or the tank plug.
Wiring diagram
No wiring diagram is available for the component
Error codes
"Key diagnosis" error: "wrong key". The key has been detected but is not associated with the hands free system. The fault can only be viewed from the dds after switching the dashboard on with the pin code.
- Check that the key is correct.
- Reprogramme the key
- If none of the tests described above identify the problem, replace the hands free system
"Key diagnosis" error: "encryption error". The encrypted code stored in the key is not recognised by the hands free system. The fault can only be viewed from the dds after switching the dashboard on with the pin code.
- Check that the key is correct.
- Check that the key is not damaged.
- Check that the antenna is working correctly.
- Reprogramme the key
- If none of the tests described above identify the problem, contact ducati
Electrical characteristics and checking component
The component has no specific electrical characteristics and requires no special checks.
In the event of fault
In the event of a fault, try reprogramming the key.
Component replacement methods
The component does not require replacement.
 Active key
Introduction
The active key (1) communicates with the hands free system by radio. In order
to function, the key must be within a 1.5
Metre radius from the antenna (located in the document compartm ...
 Programming/reprogramming keys
The dds diagnosis instrument is required in order to programme/reprogramme
the keys. The key programming procedure
is launched from this instrument.
To start the key programming/reprogramming pr ...
Other materials:
Checking engine oil level
Check the engine oil level through the sight glass (1) on the
clutch cover. When checking oil level, the motorcycle should
be perfectly upright and the engine cold. The oil level should
be between the two marks next to the sight glass. If level is
low, top up with shell advance ultra 4 engine oi ...
Protective apparel
Always wear a helmet. Most motorcycle accident fatalities
are due to head injuries.
For safety eye protection, gloves, and high top, sturdy boots
should also be worn.
The exhaust system becomes very hot during operation,
never touch the exhaust system. Wear clothing that fully
covers your ...
Timing system
Desmodromic (type) with four valves per cylinder,
operated by eight rocker arms (4 opening rockers and 4
closing rockers) and two overhead camshafts. It is operated
by the crankshaft through spur gears, belt rollers and toothed
belts.
Desmodromic timing system (fig. 159)
Opening (or upp ...