
Ducati Diavel Service Manual: Running lights not working
Fault codes
Dds: no fault code displayed.
Dashboard: no fault code displayed.
Location of connections and components
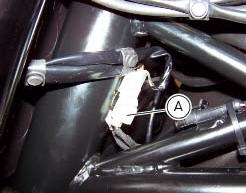
(A) low / high beam and parking light connections rear running light and stop light connection.
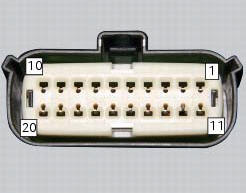
Pin numbering of wiring harness side bbs unit connection.
Checks
The front and rear parking lights use led light units and receive a 12 v power supply. Power the parking lights with an external 12 v power supply to test function (connect correctly as indicated in the wiring diagram).
Check congruence of the ground connection on the running lights.
Check that the parking lights receive 12v arriving from pin 7 of the bbs.
Check the integrity of the electrical circuit and connections (short-circuits to ground, short-circuits to vdc, open circuits).
If none of the aforementioned tests identifies the problem, replace the bbs.
Note
Check integrity of electric circuit - short-circuit to vdc = with dashboard on, using a voltmeter, a voltage is measured between the wire tested and ground.
Check integrity of electric circuit - short-circuit to ground = with the battery cables disconnected, using an ohmmeter, continuity is detected between the wire tested and ground.
Check integrity of electric circuit - open circuit = with the battery cables disconnected, using an ohmmeter, no continuity is detected between the two ends of the wire tested.
 Number plate light not working
Fault codes
Dds: no fault code displayed.
Dashboard: no fault code displayed.
Location of connections and components
Location of rear turn indicator and number plate light connection.
p ...
 Dashboard menu option scrolling not possible
Fault codes
Dds: no fault code displayed
Dashboard: no fault code displayed
Location of connections and components
Location of left hand handlebar switchgear set connection.
Pin numbering ...
Other materials:
Rectifier-regulator
The rectifier (1) is placed in the electrical components compartment.
The rectifier/regulator consists of an aluminium casing containing the diodes
that rectify the current produced by the
alternator. It also contains an electronic device that regulates the current
supplied by the alternator ...
Clutch lever button
Introduction
The clutch button is located on the clutch lever. Together with the signal
from the side stand button and the neutral signal
generated by the gear sensor (transmitted to the engine control unit over the
can line), the clutch lever position signal is
used to enable or disable engi ...
Recovery in the event of flat active key battery
If the active key battery is running low or is flat, the hands free system
shows the relative icon on the dashboard.
The following image shows the icon appearing on the circular area of the
dashboard: this indicates that the active key
battery is flat.
For the replacement procedure of t ...