
Ducati Diavel Service Manual: Bleeding of the abs hydraulic system
If some "sponginess" is detected on the brake control, due to air bubbles in the system, bleed the system, as indicated in sect. 4 - 3, Changing the brake fluid.
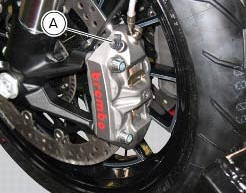
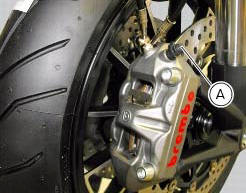
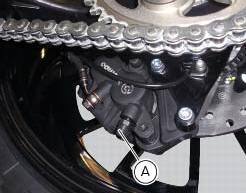
Before bleeding a brake pump, move back the calliper pistons, as indicated in (sect. 4 - 3, Changing the brake fluid) to Drain in the pump the air collected near the abs control unit purge must be carried out by means of the corresponding joints (a) placed near the callipers and the brake pumps.
Important
Do not undo the fixing screws of the joints of the pipes on the abs hydraulic control unit, unless control unit replacement is necessary.
Important
If the abs control unit is replaced, this must be supplied with secondary circuit already full of fluid; the control unit must be fitted and the system filled and bleeded as a traditional system.
 Adjusting of the air-gap phonic wheel sensor
(For front as well as rear sensor) in each case of maintenance that foresees:
Replacement or refitting of the wheel
Replacement or refitting of the phonic wheel (1) or (2)
Replacement or refit ...
 Handlebar unit
...
Other materials:
Refitting the exhaust system
Refit the heat guard on the manifold (10) by tightening the nuts (9) to a
torque of 10 nm +/- 10% (sect. 3 - 3, Frame
torque settings).
Position the vertical exhaust manifold (22) on the vertical cylinder head
with the gasket (23).
Tighten the fixing nuts (21) to a torque of 10 nm +/- 1 ...
How to switch the dashboard on
The dashboard may switched on either from the on/off switch on the handlebar
or from the button on the hands free
system.
With the engine off, the on/off switch is turned to "run off".
With the motorcycle and dashboard off, the on/off switch is turned to "run
off".
To switch the dash ...
Information about the model
Identification data
Diavel identification data
Each ducati motorcycle has two identification numbers -the frame number and
the engine number- and an ec nameplate
(a) (not present on the us version).
Note
Please quote these numbers, which identify the motorcycle model, when
ordering spare pa ...