
Ducati Diavel Service Manual: Dashboard
Note
The dashboard is supplied as a single component; its internal components cannot be renewed separately.
Important
Whenever the dashboard is renewed, the ignition key programming procedure must be repeated.
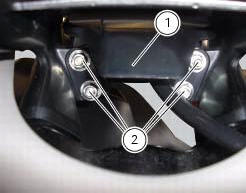
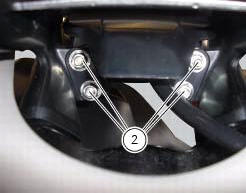
Loosen the nuts (2) to remove the master dashboard (1) from its seat and disconnect the connector (a) of the main wiring.
To remove the slave dashboard (3) remove the front tank fairing as indicated in sect. 5 - 2, "Removal of the fuel tank fairings".
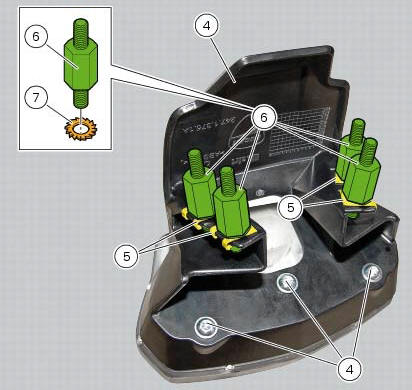
Refitting is the reverse of removal; be sure to check that the dashboard is mounted on its support with the screws (4) tightened to a torque of 3 nm +/- 10% (sect. 3 - 3, Frame torque settings).
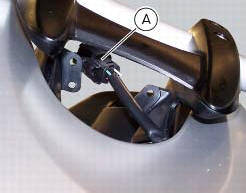
Check the presence of clips (5) and stud bolts (6) with washers (7). The stud bolts (6) must be tightened to a torque of 2 nm +/- 10% (sect. 3 - 3, Frame torque settings).
Tighten the nuts (2) to a torque of 3 nm +/-10% (sect. 3 - 3, Frame torque settings).
 Instruments
...
 Dashboard system
The vehicle is equipped with two dashboards: an lcd (1) located on the
handlebar containing the key indications (speed,
rpm, engine coolant temperature, and clock) and a tft colour display (2) loca ...
Other materials:
Low hands free key (hf) battery level
The activation of this (amber yellow) "warning" indicates that the hands free
system has detected that the battery that
permits the active key (a) to communicate and turn the vehicle on is almost
discharged.
Note
In this case replace as soon as possible the battery as indicated in sect.
6 - ...
Valves - rocker arms
Closing rocker arm shaft
Opening rocker arm shaft
Opening rocker arm
Closing rocker arm (left)
Valve opening shim
Half rings
Valve closing shim
Sealing ring
Valve guide
Exhaust valve seat
Exhaust valve
Plug
Intake valve seat
Intake valve
Aluminium gasket
Closing ...
Disassembly of structural components and the frame
Before carrying out dimensional checks on the frame, you must remove all the
superstructures fitted, referring to the
removal procedures outlined in the sections of this manual.
The rear subframes (2) and (3) are structural components of the frame (1).
Both serve to support motorcycle super ...