
Ducati Diavel Owners Manual: Adjusting throttle control free play
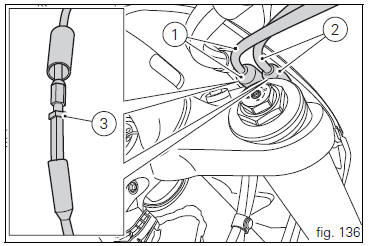
The throttle twistgrip must have free play of 1.5×2.0 Mm in all steering positions, measured on the outer edge of the twistgrip. If necessary, adjust it using the adjusters (1 and 2, fig. 135) Located on the headstock on the right-hand side of the vehicle.
Adjuster (1) is for throttle opening, and adjuster (2) is for throttle closing.
Slip the rubber gaiters off the adjusters and loosen the counter nuts (3). Adjust both adjusters by the same amount: turn clockwise to increase free play and anticlockwise to reduce free play. When finished, tighten the counter nuts (3) and refit the rubber gaiters to the adjusters.

 Lubricating cables and joints
Check the outer sheath of the throttle control and cold start
lever cables for damage at regular intervals. The outer plastic
cover should not be flattened or cracked. Operate the
controls to make ...
 Charging the battery
Before charging the battery, it is recommended to remove it
from the motorcycle.
Important
The battery is housed in the cowling, always contact
a ducati dealer or an authorised service centre for ...
Other materials:
Gear change pedal
When released, the gear change pedal (1, fig. 96)
Automatically returns to rest position n in the centre. This is
indicated by the instrument panel light n (2, fig. 4) Coming on.
The pedal can be moved:
down = press down the pedal to engage the 1st gear and to
shift down. At this point the n ...
Lubricating cables and joints
Check the outer sheath of the throttle control and cold start
lever cables for damage at regular intervals. The outer plastic
cover should not be flattened or cracked. Operate the
controls to make sure the inner cables slide smoothly inside
the outer sheath: if you feel any friction or catching, ...
Front brake lever
Pull the lever (1, fig. 94) Towards the twistgrip to operate the
front brake. The system is hydraulically assisted and you only
need to pull the lever gently.
The control lever (1, fig. 94) Features a dial adjuster (2, fig. 94)
For lever distance from the twistgrip on handlebar
adjustment.
...