
Ducati Diavel Service Manual: Gearchange mechanism
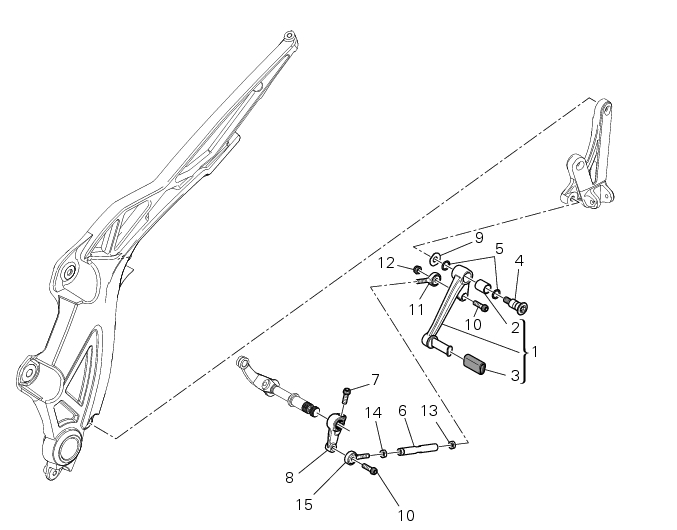
- Gearchange pedal
- Bush
- Rubber pad
- Pin
- O-ring
- Gearchange lever tie-rod
- Screw
- Gearchange lever
- Washer
- Screw
- Ball joint
- Nut
- Nut
- Nut with left-hand thread
- Lh ball joint
Spare parts catalogue
Diavel abs l.H. Footrests
Diavel carbon abs l.H. Footrests
Important
Bold reference numbers in this section identify parts not shown in the figures alongside the text, but which can be found in the exploded view diagram.
- Removal of the gearchange control
- Disassembly of the gearchange mechanism
- Refitting the gearchange mechanism
 Refitting the hands free
Reassembly is a reversal of the removal procedure: in particular apply
prescribed threadlocker to screws (2) and tighten
them to a torque of 20 nm +/- 10% (sect. 3 - 3, Frame torque settings).
I ...
 Removal of the gearchange control
Loosen and remove the pivot screw (4) securing the gearchange pedal (1) and
recover the washer (9) and the o-ring Seals (5).
Loosen and remove the screw (7) securing the gearchange lever (8 ...
Other materials:
Fuel pressure test
Note
The on-screen icons used during this procedure are explained in a table at
the end of this section.
Undo the screws (2) and remove the flange cover (1).
Remove one of the two pipes of the fuel system (3).
Use the fuel pressure pipe (4) part no. 590.1.189.1A by connecting one e ...
Refitting the rear-view mirrors
Start the screws (2) in their thread on the rear-view mirrors (1), inserting
the washers (4) as shown in the picture.
Insert the rear-view mirrors (1) in the u-bolts (3).
Tighten the screws (2) to a torque of 25 nm +/-10% (sect. 3 - 3, Frame torque
settings).
Warning
The left rear-view ...
Adjusting the position of the gear change and rear brake pedals
The position of the gear change and rear brake pedals in relation to the
footrests can be adjusted to suit the preferred
riding position.
To modify the gear change pedal position act in the following mode:
hold the linkage (1) and slacken the counter nuts (2) and (3).
Note
Nut (2) has a lef ...