
Ducati Diavel Service Manual: Inspecting the final drive
To check the wear of the final drive, visually check the pinion (14) and sprocket (17). If the teeth are found to worn as shown in the figure (dotted line), the sprocket must be renewed.


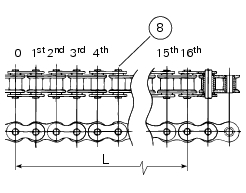
To check the amount of wear on the chain (8), keep the chain taut and measure 16 links.
If the length (l) is greater than 256.5 Mm, the chain should be replaced.
Important
The sprocket (17), engine pinion (14) and chain (8) must all be replaced together as a set.
 Final drive
Circlip
Nut
Washer
Nut
Rear sprocket flange
Cush drive bush
Inner ring
Chain
Spacer
Chain cover
Screw
Nut
Lock washer
Front sprocket
Spacer
O-ring
Rear sprocket
...
 Removing of the front sprocket
Undo the screws (11) and remove the chain cover (10).
Loosen the chain (sect. 4 - 3, Adjusting the chain tension).
Remove the chain with the tool code 88713.1344.
The tool is composed of a ...
Other materials:
Hands free key (hf) not recognised
The activation of this (amber yellow) "warning" indicates
that the hands free system does not detect the active key
(1, fig. 62) Near the vehicle.
Note
In this case, ducati recommends checking that the
active key (1, fig. 62) Is near the vehicle (and has not been
lost) and that it f ...
Indicator cons. Avg - average fuel consumption
This function indicates the "average" fuel consumption.
The calculation is made considering the quantity of fuel used and the km
travelled since the last trip 1 reset. When trip 1
is reset, the value is set to zero and the first available value is shown on the
display 10 seconds after the re ...
Frame torque settings
*Dynamic safety-critical point; tightening torque must be within nm +/-5%.
Note
For product specifications and symbols, refer to "product specifications"
(sect. 1 - 2). ...