
Ducati Diavel Service Manual: Refitting the brake disks
Before refitting the brake disc to the wheel, clean all contact surfaces thoroughly and smear a medium strength threadlocker on the threads of retaining screws (5).
Operating on the left side, fit the phonic wheel (6).
Tighten the fixing screws (5) of the brake disk (7) to the wheel following this sequence: 1-3-5-2-4.
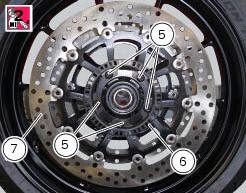
Tighten the screws (5) to the torque of 25 nm +/- 5% (sect. 3 - 3, Frame torque settings).
Refit the wheel on the motorcycle (sect. 7 - 1, Refitting the front wheel).
 Overhauling the front brake components
Important
Critical safety components. The brake calliper manufacturer recommends
that you do not attempt to service the internal
components of the brake callipers. Incorrect overhaul of this compo ...
 Refitting the front brake system
While refitting the system, pay special attention to the orientation of the
pipe couplings (24) on the pump and the pipes
(13) and (20) on the callipers (9) and (18).
Warning
If incorrectly posit ...
Other materials:
Appropriate diagnosis tools
97900.0211 Dds (ducati diagnosis system) without cables
97900.0227 Power cable and diagnosis
97900.0222 Power cable and diagnosis 1060838 (measurement module)
97900.0218 Vacuum sensor
552.1.039.1A Pressure sensor
97900.0220 Pressure/vacuum tube
97900.0221 Union
...
Renewal of the headlight
Disconnect the headlight connectors (a) from the main wiring (refer to the
tables of paragraph "routing of wiring on
frame", sect. 6 - 1).
Loosen nuts (2) that fix the front optical unit to the bottom yoke, and
recover the washers (3).
Remove the complete front optical unit by sliding ...
Replacing the front phonic wheel sensor
Disconnect the front abs sensor (2) connector (a) from the main electric
wiring.
Open all the retainer clamps of the front abs sensor cable (2): refer to table
of sect. 7 - 6, Flexible wiring/hoses
positioning.
Loosen retaining screw (1) and remove the front abs sensor (2) with
ca ...