
Ducati Diavel Service Manual: Removal of the primary drive gear

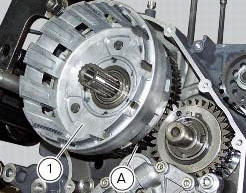
Withdraw the clutch housing (1) complete with driven gear of the primary pair (a).
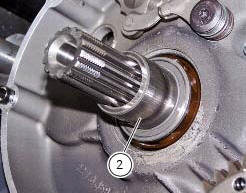
Remove the inner spacer (2).
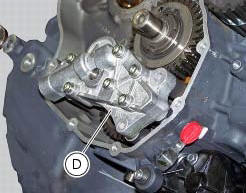
Remove the oil pump (d) (sect. 9 - 2.1, Removal of the oil pump).
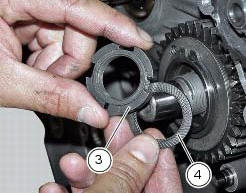
Lock the primary pinion (b) with the holding tool 88713.3417 And loosen the threaded ring nut (3) using the bush part no. 88713.3406.
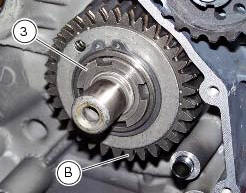
Remove the nut (3) and safety washer (4).
Remove the complete primary drive gear (b) using a commercial puller and placing a brass or aluminium pad between the end of the crankshaft and the puller screw.
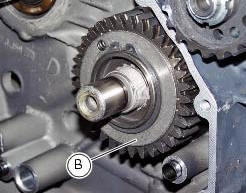
Remove the spacer (c).

 Primary drive gears
Clutch drum/primary drive gears
Spacer
Threaded ring nut
Lock washer
Spare parts catalogue
Diavel abs clutch
Diavel abs connecting rods
Diavel carbon
abs
clutch
Diavel carbon
ab ...
 Refitting the primary drive gears and checking backlash
Fully degrease the crankshaft splined end and the corresponding spline on the
primary drive gear.
Position the spacer (c) onto the crankshaft.
Fit the driving gear (b) onto the crankshaft wi ...
Other materials:
Abs disabling function
This function disables or enables the abs.
To access the function it is necessary to view the "setting" menu page 48, using
button (1, fig. 14) ?"
" or (2, fig. 14) ?"" select the "abs" function and
press the reset button
(12, fig. 12) To go to next ...
Clock setting function
This function sets the clock.
To access the function it is necessary to view the ""setting" menu", using
buttons (1) "s" or (2) "t" select the "clock"
function and press the reset button (3) to confirm.
In the following screen the message "setting" is highlighted in green (4); now,
press ...
Crankcase halves
Bearing
Bearing holder bushing
Alternator-side crankcase half
Bearing
Circlip
Washer
Bearing
Sealing ring
Bearing
Retaining plate
Screw
Screw
Clutch-side crankcase half
Sealing ring
Bearing
Circlip
Bearing holder bushing
Bearing
Plug
Screw
Spacer
Bush ...