
Ducati Diavel Owners Manual: Tank filler plug
 Note
Note
To open or close the tank filler plug using the active key, set the metal part in the middle position, as shown on page 86.
Opening
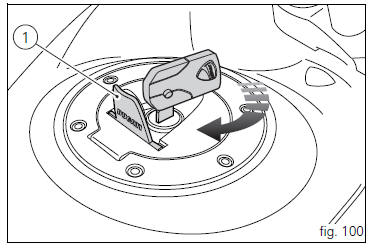
Lift the cover (1, fig. 100) And insert the active or passive key into the lock. Give the key a 1/4 turn clockwise to unlock.
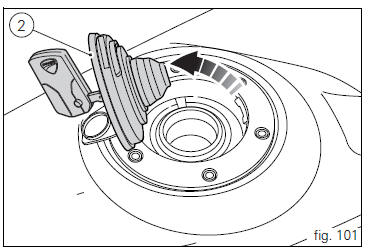
Lift the plug (2, fig. 101).
Closing
Close the cap (2, fig. 101) With the key inserted and press it into its seat. Remove the key and replace the lock cover (1, fig. 100).
 Note
Note
The cap can only be closed with the key inserted.
 Warning
Always make sure you have properly refitted (see page 140) and closed the plug after each refuelling.
Seat lock
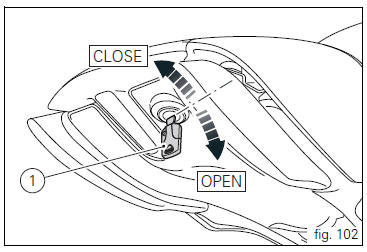
Work latch (1, fig. 102) To remove the seat and access to the underseat compartment and any other device under it.
 Position on the vehicle
Tank filler plug.
Seat lock.
Side stand.
Rear-view mirrors.
Front fork adjusters.
Rear shock absorber adjusters.
Catalytic converter.
Exhaust silencer (see "warning" on ...
 Side stand
Insert the active or passive key in the lock (1, fig. 102), Turn it
clockwise and simultaneously apply downward pressure in
the area of the catch to release the pin. Pull the seat
backwards to rele ...
Other materials:
Removing of the front sprocket
Undo the screws (11) and remove the chain cover (10).
Loosen the chain (sect. 4 - 3, Adjusting the chain tension).
Remove the chain with the tool code 88713.1344.
The tool is composed of a holder (a), punch (b), body (c) and two wrenches (d)
and (e).
Fit the link to be opened into th ...
Trip 2 meter
This function shows the distance travelled since the trip meter was last
reset (in km or miles depending on the specific
application).
Press and hold (1) "s" for 3 seconds while in this function to reset the trip
odometer.
When the reading exceeds 9999.9, Distance travelled is reset and t ...
Refitting the timing gears
Before reassembling the removed parts, check timing gears (13) for wear.
Change, if necessary.
Important
The timing gears (13) must always be renewed as a pair.
Refitting is the reverse of removal.
Warning
When introducing the driven gear (b) check that the tongue (15) is
correctly fitted o ...