
Ducati Diavel Owners Manual: Checking engine oil level
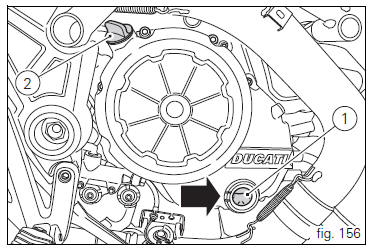
Check the engine oil level through the sight glass (1) on the clutch cover. When checking oil level, the motorcycle should be perfectly upright and the engine cold. The oil level should be between the two marks next to the sight glass. If level is low, top up with shell advance ultra 4 engine oil. Remove the filler plug (2) and top up to correct level. Replace the filler cap.
 Important
Engine oil and oil filters must be changed by a ducati dealer or authorised service centre at the intervals specified in the scheduled maintenance table reported in the warranty booklet.
Viscosity
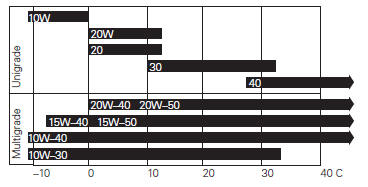
Sae 15w-50
The other viscosity values shown in the table can be used if the local average temperature falls within the limits specified for that oil viscosity.
 Tubeless tyres
Front tyre pressure:
2.50 Bar (rider only) - 2.6 Bar (with passenger and/or bags)
rear tyre pressure:
2.50 Bar (rider only) - 2.6 Bar (with passenger and/or bags)
as tyre pressures are affected by ...
 Cleaning and replacing the spark plugs
Spark plugs are essential to smooth engine running and
should be checked at regular intervals.
The condition of the spark plugs provides a good indication of
how well the engine is running.
Ha ...
Other materials:
Battery voltage indicator (battery)
This function describes the battery voltage indicator.
To access the function it is necessary to view the ""setting" menu", using
buttons (1) "s" or (2) "t" select the "battery"
function and press the reset button (3) to confirm.
The information will be displayed as follows:
if battery vol ...
Operations to be carried out by the dealer
List of operations to be performed at 1000 km
Reading of the error memory with dds on the engine control units,
vehicle and abs
Change the engine oil
Change the engine oil filter
Check the indicators and lighting
Check the safety devices (side ...
Draining the clutch hydraulic circuit
Warning
Clutch fluid will damage painted surfaces if spilled on them. It is
also very harmful if it comes into contact with the skin or
with the eyes; in the case of accidental contact, wash the affected area
thoroughly with plenty of running water.
Remove the dust cap to expose the bleed val ...