
Ducati Diavel Service Manual: Description of the clutch assembly
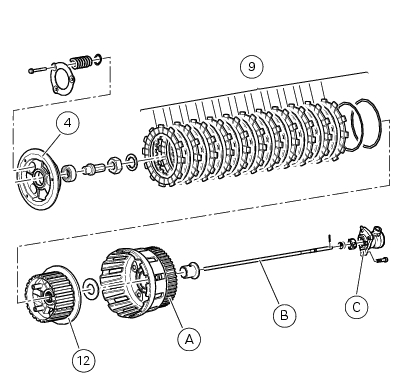
The clutch is disengaged by a drive unit consisting of a thrust piston (c) accommodated inside a small cap mounted to the generator cover. This piston (c) pushes a pushrod (b), which runs through gearbox primary shaft and operates the Pressure plate (4) located on top of the clutch plate pack (9).
Drive is transmitted from the crankshaft to the gearbox primary shaft by a gear integrated with the clutch housing/primary drive gear pair (a).
Accommodated in the clutch housing is a set of drive and driven plates (9). When the clutch is operated, the driven plates push away a drum (12) which is splined onto the gearbox primary shaft.
Before working on the internal clutch parts, check that the clutch operates correctly. Then deal with the problem in a systematic manner.
The following is a list of possible causes of clutch malfunctions.
A clutch which does not disengage may be caused by:
- Excessive play of the control lever;
- Distorted clutch plates;
- Incorrect spring tension;
- Faulty clutch release mechanism;
- Excessive wear of the hub or clutch drum.
A clutch which slips may be caused by:
- Insufficient play of the control lever;
- Insufficient play of the control lever;
- Weakened springs;
- Faulty clutch release mechanism;
- Excessive wear of the hub or clutch drum.
A noisy clutch may be caused by:
- Excessive backlash between the primary drive gears;
- Damaged primary drive gear teeth;
- Excessive play between friction plate tabs and the clutch drum;
- Worn gear/clutch drum bearings;
- The presence of metal particles (filings) on the gear teeth.
 Clutch
Screw
Ring
Clutch spring
Pressure plate
Bearing
Circlips
Nut
Belleville washer
Clutch plates
Belleville washer
Flat ring
Clutch centre
Spacer
Clutch lifter
Spare pa ...
 Removal of the clutch
Note
For clarity, the figures show the engine removed from the frame.
Undo the fixing screws (1) and remove the ring (2) and the springs (3) from
the pressure plate (4).
Slide the pre ...
Other materials:
Indicator cons. - Instantaneous fuel consumption
This function indicates the "instantaneous" fuel consumption.
The calculation is made considering the quantity of fuel used
and the distance travelled during the last second. The datum is
expressed in "l/100" (litres / 100 km); it is possible to change
the units of measurem ...
Deactivating the service indication on the dashboard
The message "serv" is displayed on the dashboard, indicating that the
motorcycle should be serviced in accordance with
the programmed maintenance plan. This indication is activated after the first
1000 km and thereafter at intervals of
12000 km.
After the scheduled service has been carried ...
Disassembly of the clutch cover
Remove the plug (14) and its o-ring (13), the plug (17) and its o-ring (15)
from the cover.
Undo the fixing screw (16) of the inner cover (19).
Remove the inner cover (6) and soundproofing panel (18).
Remove the circlip (10) and withdraw the shim (9) and the sealing ring (8).
The dri ...