
Ducati Diavel Service Manual: Reassembly of the clutch-side crankcase cover
Fit the plug (14) and the gasket (13). Fit the plug (17) and the gasket (15).
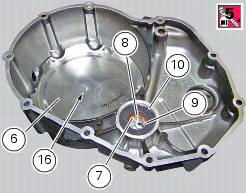
If the bush has been replaced, fully seat the new bush (7) in the slot in the cover using a suitable drift and a press.
If the sealing ring (8) needs to be renewed, fit the new seal into the crankcase cover, positioning it so the side without a spring is facing the circlip (10).
Before fitting, check that the edges of the circlip groove show no sign of burrs which might otherwise damage the sealing ring.
Then fit the shim (9) and the circlip (10).
Important
In order for the sealing ring (8) to function correctly, it must have an assembly clearance that allows the circlip (10) to rotate.
Place the soundproofing panel (18) inside the clutch cover (1).
Position the inner cover (19) on the panel (18), aligning it with the pin (d).
Apply the recommended threadlocker to the screw (16) tighten the retaining screw (16) to a torque of 24 nm (min. 22 Nm - max. 26 Nm) (sect. 3 - 3, Engine torque settings).
 Disassembly of the clutch cover
Remove the plug (14) and its o-ring (13), the plug (17) and its o-ring (15)
from the cover.
Undo the fixing screw (16) of the inner cover (19).
Remove the inner cover (6) and soundproofing p ...
 Refitting the clutch-side crankcase cover
Clean and degrease mating surfaces on the clutch-side crankcase half cover
and crankcase and ensure that locating bush
(12) and the o-ring (11), located in correspondence with the oil way, are
in ...
Other materials:
Camshafts
Head
Stud bolt
Special screw
Sealing washer
Horizontal cylinder head cover
Vertical cylinder head cover
Special screw
O-ring
Head gasket
Screw
Pin
Union
Clamp
Horizontal cylinder exhaust camshaft
Horizontal cylinder intake camshaft
Plug
Sealing ring
Vertical ...
Engine torque settings
*Dynamic safety-critical point; tightening torque must be within nm +/-5%.
Note
For product specifications and symbols, refer to paragraph "product
specifications" (sect. 1 - 2). ...
Reassembly of belly fairing
Position the oil cooler shield (7) inserting the tab (a) into the slit (b) in
the electrical components support (s).
Note
On refitting, make sure that the tab (c) remains positioned under the
retainers (d) of the shield (7).
Fit clips (11) on bracket (13) and orient them as shown in the f ...