
Ducati Diavel Service Manual: Immobilizer override procedure
This procedure makes it possible to "temporarily" turn on the motorcycle if the hf (hands free) system is not working.
Note
The pin code function must be activated by entering your 4 digit pin in the dashboard, otherwise the vehicle cannot be turned on temporarily in the case of a malfunction.
Warning
The motorcycle owner must activate (store) the pin code; if there is already a stored pin, contact an authorised ducati dealer to have the function "reset". To perform this procedure, the authorised ducati dealer may ask you to demonstrate that you are the owner of the motorcycle.
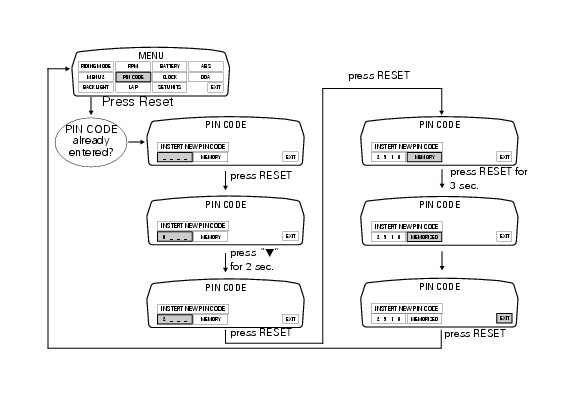
Pin code activation function to access the function it is necessary to view the "setting"menu, using buttons (1) "s" or (2) "t" to select the "pin code" function and press the reset button (3) to enter the following page.
Note
If "modify pin code" appears when accessing this function, this means that there is already a stored pin and therefore the function is already active.
When accessing the function, "insert new pin code" with four dashes "- - - -" in the bottom line will appear on the display highlighted in green; now enter a 4 digit code.
Entering the code: press the reset button (3).
Pressing button (2) "t" repeatedly cycles the highlighted number from "0" to "9" and then back to "0"; to confirm the number, press the reset button (3).
Repeat the procedure until inserting the fourth digit.
To highlight the "memory" indication, press the reset button (3) again.
To store the entered pin, press the reset button (3) for 3 seconds with "memory" indication highlighted in green.
As a confirmation of pin storage, the display will show the message "memorized" for about 2 seconds and then automatically highlight "exit" option.
From this moment, "modify pin code" will be displayed when accessing the "pin code" function and the pin can be Changed again as many times as necessary (without limits).
To exit the setting function, press the reset button (3) when "exit" is highlighted.
 Abs disabling function
This function disables or enables the abs.
To access the function it is necessary to view the ""setting" menu", using
buttons (1) "s" or (2) "t" to select the "abs"
function and press the reset ...
 Pin code change function
This function changes your four number pin code.
To access the function it is necessary to view the "setting"menu, using buttons
(1) "s" or (2) "t" to select the "pin code"
function and press th ...
Other materials:
Setting menu
This menu is used to enable/disable and set some motorcycle functions.
To access the "setting menu" press and hold button (2) "t" for 3 seconds.
Note
When within this menu no other function can be displayed.
Important
For safety reasons, the setting menu can only be accessed when motorcycle
...
Guided diagnosis
Note
The on-screen icons used during this procedure are explained in a table at
the end of this section.
The dds diagnosis instrument guides the operator step-by-step through the
various diagnostic procedures,
providing descriptions and documentation for motorcycle components, wiring
diagra ...
Clutch lever
Lever (1) disengages the clutch. It features a dial adjuster (2)
for lever distance from the twistgrip on handlebar.
The lever distance can be adjusted through 10 clicks of the
dial (2). Turn clockwise to increase lever distance from the
twistgrip. Turn the adjuster counter clockwise to decrea ...