
Ducati Diavel Service Manual: Fairings
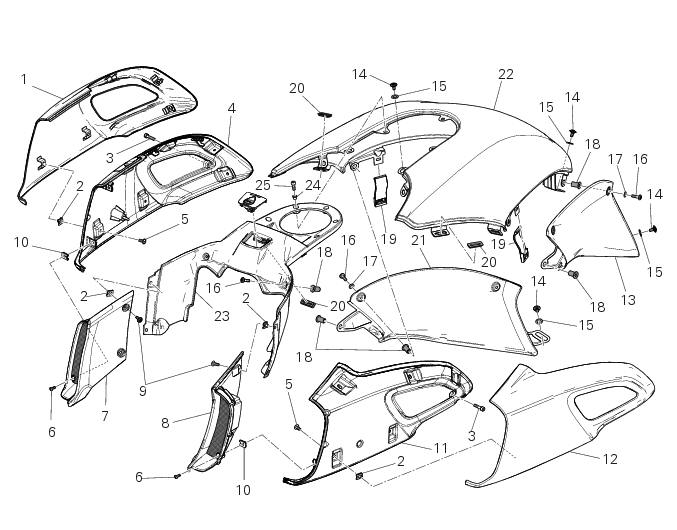
- Rh front half-fairing
- Clip
- Screw
- Right-hand support
- Screw
- Screw
- Rh air inlet
- Lh air inlet
- Screw
- Clip
- Left-hand support
- Lh front half-fairing
- Lh tank fairing
- Screw
- Nylon washer
- Special screw
- Washer
- Spacer
- Spring
- Rubber pad
- Rh tank fairing
- Tank fairing
- Tank plug cover
- Spacer
- Screw
Spare parts catalogue
Diavel abs fairing
Diavel carbon abs fairing
Important
Bold reference numbers in this section identify parts not shown in the figures alongside the text, but which can be found in the exploded view diagram.
- Removal of the fuel tank fairings
- Disassembly of the front half-fairings
- Reassembly of the front half-fairings
- Refitting the fuel tank fairings
 Refitting the rear-view mirrors
Start the screws (2) in their thread on the rear-view mirrors (1), inserting
the washers (4) as shown in the picture.
Insert the rear-view mirrors (1) in the u-bolts (3).
Tighten the screws ...
 Removal of the fuel tank fairings
Remove the rh air inlet (7) by loosening screws (6) and (9).
Undo the retaining screw (3) of the rh front half-fairing (1).
Slightly pull the pin (a) to disengage it from the seal (b), a ...
Other materials:
Checking and topping up coolant level
Check coolant level in the expansion tank on the right side of
the vehicle.
Steer the handlebar completely to the left and check that the
level is between the min and max marks on the side of the
expansion reservoir.
Top up if the level is below the min mark.
Unscrew the filler plug (1) ...
Noise and exhaust emission control
system information
Source of emissions
The combustion process produces carbon monoxide and
hydrocarbons. Control of hydrocarbons is very important
because under certain conditions, they react to form
photochemical smog when subjected to sunlight.
Carbon monoxide does not react in the same way, but is
toxic. Duca ...
The hands free relay
Introduction
This relay provides key on +15 power to all the devices on the motorcycle.
Functionally, it replaces the conventional
ignition switch.
Wiring diagram
The hands free relay receives +12 volt power directly from the battery via
the main 30 a fuse. Hands free - 3: pin 3 on
hand ...