
Ducati Diavel Owners Manual: Immobilizer override procedure
This procedure makes it possible to "temporarily" turn on the motorcycle if the hf (hands free) system is not working.
 Note
Note
The pin code function must be activated by entering your 4 digit pin in the instrument panel, otherwise the vehicle cannot be turned on temporarily in the case of a malfunction.
 Warning
The motorcycle owner must activate (store) the pin code; if there is already a stored pin, contact an authorised ducati dealer to have the function "reset". To perform this procedure, the authorised ducati dealer may ask you to demonstrate that you are the owner of the motorcycle.
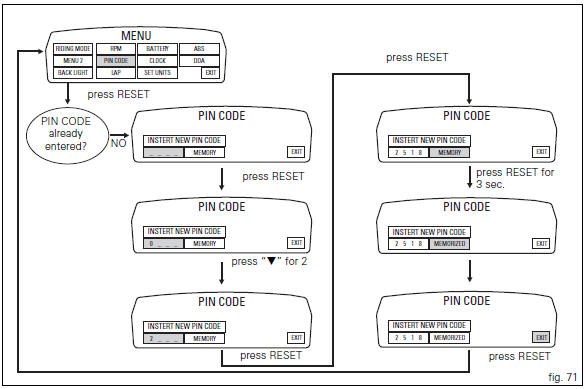
Pin code activation function
To access the function it is necessary to view the "settin"h menu page 48,
using button (1, fig. 14) ?" " or (2,
fig. 14) ?" " select
the "pin code" function and press the reset
button (12, fig. 12) To go to next page.
 Note
Note
If "modify pin code" appears when accessing this function, this means that there is already a stored pin and therefore the function is already active.
When accessing the function, "insert new pin code" with four dashes "- - - -" in the bottom line will appear on the display highlighted in green; now enter a 4 digit code.
Entering the code: press the reset button (12, fig. 12); Each time you press
the button (2, fig. 14) ?"
" the displayed
number increases from "0" to "9" and then returns to "0";
to confirm the number, press the reset button (12, fig. 12).
Repeat the procedure until inserting the fourth digit.
To highlight the "memory" indication, press the reset button (12, fig. 12) Again.
To store the entered pin, press the reset button (12, fig. 12) For 3 seconds with "memory" indication highlighted in green.
As a confirmation of pin storage, the display will show the message "memorized" for about 2 seconds and then automatically highlight "exit" option.
From this moment, "modify pin code" will be displayed when accessing the "pin code" function and the pin can be changed again as many times as necessary (without limits).
To exit the setting function, press the reset button (12, fig.
12) When "exit"is highlighted.
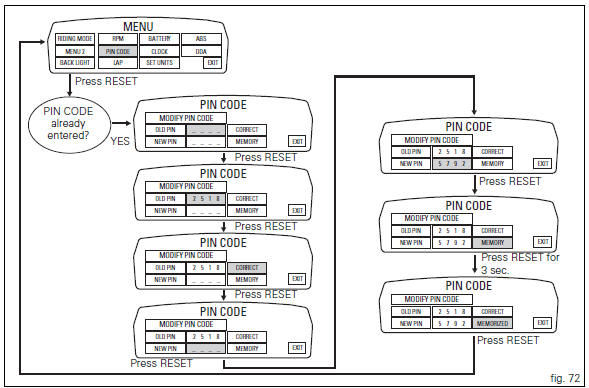
Pin code change function
This function changes your four number pin code.
To access the function it is necessary to view the "setting" menu page 48, using
button (1, fig. 14) ?" " or (2, fig.
14) ?" " select
the "pin code" function and press the reset
button (12, fig. 12) To go to next page.
 Note
Note
If "insert new pin code" and the dashes "- - - -" appear when accessing this function, this means that the function was not active as the pin code was never entered.
Enter your pin as described in the previous paragraph "pin code activation function".
When accessing the function, "modify pin code", "old pin" with four dashes "- - - -" in the bottom line will appear on the display highlighted in green; now enter the 4 digit code.
 Note
Note
To change the pin, you must know the currently stored pin.
Now you shall enter the "old" pin code (old pin).
Press the reset button (12, fig. 12); Each time you press the button (2, fig.
14) ?" " the displayed number increases from
"0" to "9" and then returns to "0";
to confirm the number, press the reset button (12, fig. 12);
Repeat the procedure until inserting the fourth digit;
press the reset button (12, fig. 12) Again to confirm.
If the entered code is incorrect, the instrument panel will return to the four dashes " - - - - " in order to enter the code again.
If the entered code is correct, "correct" is automatically highlighted in green for about 2 seconds and then the four dashes " - - - - " next to "new pin" indication are automatically highlighted; now enter the "new" 4 digit code.
Press the reset button (12, fig. 12); Each time you press the button (2, fig.
14) ?" " the displayed
number increases from
"0" to "9" and then returns to "0";
to confirm the number, press the reset button (12, fig. 12);
Repeat the procedure until inserting the fourth digit;
press the reset button (12, fig. 12) Again to confirm.
Item "memory" is automatically highlighted.
To store the entered new pin, press the reset button (12, fig.
12) For 3 seconds with "memory" indication highlighted in green.
As a confirmation of the new pin storage, the display will show message "memorized" for about 2 seconds and then "exit" is automatically highlighted.
To exit the setting function, press the reset button (12, fig.
12) When "exit" is highlighted.
 Note
Note
There is no limit to the amount of times you can change your pin code.
 Duplicate keys
If you need any duplicate keys, contact the ducati service
network with all the keys you have left.
The ducati service centre will program all the new keys as
well as any keys you already have.
...
 Light control
...
Other materials:
Checking engine oil level
Check the engine oil level through the sight glass (1) on the
clutch cover. When checking oil level, the motorcycle should
be perfectly upright and the engine cold. The oil level should
be between the two marks next to the sight glass. If level is
low, top up with shell advance ultra 4 engine oi ...
Cylinder/piston assemblies
Piston
Gudgeon pin circlip
Gudgeon pin
Set of piston rings
Cylinder-crankcase gasket
Water pump outlet union
Hose clip
Horizontal cylinder coolant inlet hose
Vertical cylinder coolant inlet hose
Cylinder barrel
Cylinder head gasket
Bush
Spare parts catalogue
Diavel a ...
Removal of the crankshaft/connecting rods assembly
After separating the crankcase halves, withdraw the crankshaft (6) complete
with connecting rods (2).
...