
Ducati Diavel Service Manual: Information about the model
Identification data
Diavel identification data
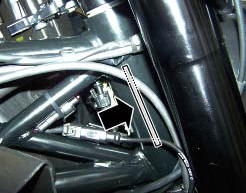
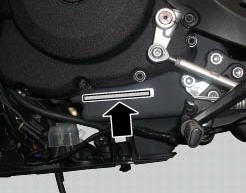
Each ducati motorcycle has two identification numbers -the frame number and the engine number- and an ec nameplate (a) (not present on the us version).
Note
Please quote these numbers, which identify the motorcycle model, when ordering spare parts.

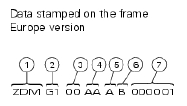
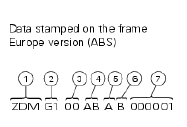
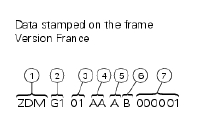
Data stamped on the frame
Europe version
- Manufacturer: ducati motor holding
- Type - same for all diavel / diavel carbon models
- Variant
- Version: aa = diavel / diavel carbon
Ab = diavel abs / diavel carbon abs
- Year of manufacture:
(A=2010)
(B=2011)
- Manufacturing facility
- Progressive serial no.
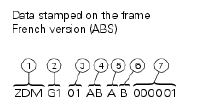
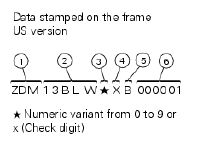
Data stamped on the frame
Us version
- Manufacturer: ducati motor holding
- Motorcycle type
- Variant - numeric or x (check digit)
- Variant - numeric or x (check digit)
- Manufacturing facility
- Progressive serial no.
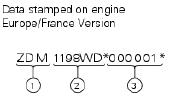
Data stamped on engine
Europe version
- Manufacturer: ducati motor holding
- Engine type
- Progressive production no.
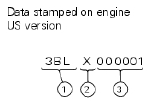
Data stamped on engine
Us version
- Engine type
- Model year (b=2011)
- Progressive production no.
 General maintenance indications
Useful tips
Ducati recommends that you follow the instructions below in order to prevent
problems and obtain the best end result:
When diagnosing faults, primary consideration should always be ...
 Technical data
...
Other materials:
Removing of the front sprocket
Undo the screws (11) and remove the chain cover (10).
Loosen the chain (sect. 4 - 3, Adjusting the chain tension).
Remove the chain with the tool code 88713.1344.
The tool is composed of a holder (a), punch (b), body (c) and two wrenches (d)
and (e).
Fit the link to be opened into th ...
Reassembly of the front half-fairings
Fit the clips (2) on the front rh half-fairing (1).
Join the rh support (4) and the front rh half-fairing (1) and keep them in
position by starting the screws (5).
Note
To mount the rh support (4) in a proper way, it is necessary to insert the
tab (g) of the front rh half-fairing (1) in t ...
How to turn the motorcycle off
To turn the motorcycle off, turn the switch from "run on" to "run off". The
engine stops. To switch the dashboard off,
push the on/off switch downwards. When released, the switch automatically
returns to the "run off" position.
Push the switch downwards to switch the engine off and enter " ...