
Ducati Diavel Service Manual: Removal of the clutch-side crankcase cover

Unscrew the screws (2), (3) and (5) securing the clutch-side crankcase cover (1).
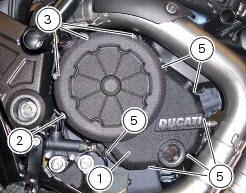
Tap around the edge of the cover with a plastic mallet to detach it from the crankcase half.
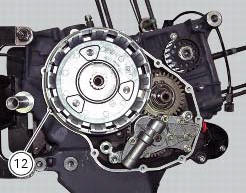
Remove the clutch cover (1) paying attention to the centring bushing (12).
Check the condition of the centring bushing (12) and replace if deformed.
 Clutch cover
Clutch-side crankcase cover
Screw
Screw
Oil level sight glass
Screw
Plate
Bush
Sealing ring
Shim washer
Circlip
O-ring
Locating bush
O-ring
Plug
Sealing washer
Scr ...
 Disassembly of the clutch cover
Remove the plug (14) and its o-ring (13), the plug (17) and its o-ring (15)
from the cover.
Undo the fixing screw (16) of the inner cover (19).
Remove the inner cover (6) and soundproofing p ...
Other materials:
Removal of the clutch
Note
For clarity, the figures show the engine removed from the frame.
Undo the fixing screws (1) and remove the ring (2) and the springs (3) from
the pressure plate (4).
Slide the pressure plate (4) paying attention to the circlips (6).
Remove the clutch control pin (14) and the ...
Lap registration function
This function describes the "lap" time registration.
If the function is activated (see "lap activation/deactivation description), the
lap time can be registered as follows:
pressing the flash headlight button (6) the first time starts the "lap timer"
for the first lap, and the dashboard show ...
Dashboard
Note
The dashboard is supplied as a single component; its internal components
cannot be renewed separately.
Important
Whenever the dashboard is renewed, the ignition key programming procedure
must be repeated.
Loosen the nuts (2) to remove the master dashboard (1) from its seat and
disconn ...