
Ducati Diavel Service Manual: Removal of the primary drive gear

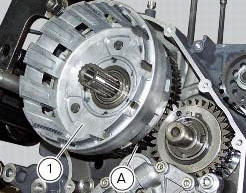
Withdraw the clutch housing (1) complete with driven gear of the primary pair (a).
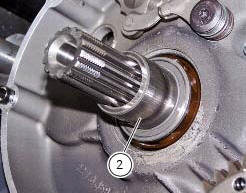
Remove the inner spacer (2).
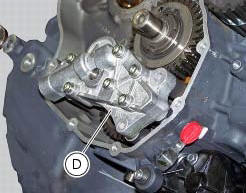
Remove the oil pump (d) (sect. 9 - 2.1, Removal of the oil pump).
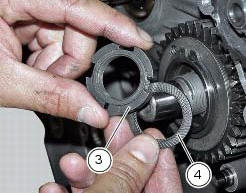
Lock the primary pinion (b) with the holding tool 88713.3417 And loosen the threaded ring nut (3) using the bush part no. 88713.3406.
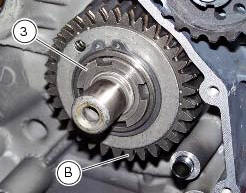
Remove the nut (3) and safety washer (4).
Remove the complete primary drive gear (b) using a commercial puller and placing a brass or aluminium pad between the end of the crankshaft and the puller screw.
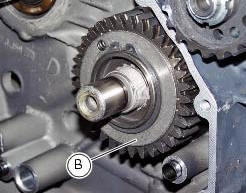
Remove the spacer (c).

 Primary drive gears
Clutch drum/primary drive gears
Spacer
Threaded ring nut
Lock washer
Spare parts catalogue
Diavel abs clutch
Diavel abs connecting rods
Diavel carbon
abs
clutch
Diavel carbon
ab ...
 Refitting the primary drive gears and checking backlash
Fully degrease the crankshaft splined end and the corresponding spline on the
primary drive gear.
Position the spacer (c) onto the crankshaft.
Fit the driving gear (b) onto the crankshaft wi ...
Other materials:
Refitting the shock absorber support
If you had removed them, apply recommended grease on the threads of the
adjusters (4) and the ring nuts (3) having
care not to have grease on the surface (c) of the adjusters.
Tighten the adjusters on the ring nut side opposite to that featuring flats
until bringing the surfaces as close as ...
Check the engine oil pressure
Note
The on-screen icons used during this procedure are explained in a table at
the end of this section.
To measure the pressure of the lubrication circuit, use the engine oil pressure
test point (19) as described below.
Disconnect the wiring connector (f) of pressure switch (1) and rem ...
On/off switch on handlebar
Introduction
The on/off switch on the handlebar is used to switch the dashboard on and
off, if a key has been detected, and start the
engine.
With the switch turned to "run off" (centre position), pushing downwards
switches the dashboard on or off (activating
the button inside the switch). ...