Ducati Diavel Owners Manual: Replacing the high and low beam bulbs
Before replacing a burnt-out bulb, make sure that the new bulb complies with the voltage and wattage specified in the "wiring diagram", page 179. Always test the new bulb before refitting any parts you have removed.
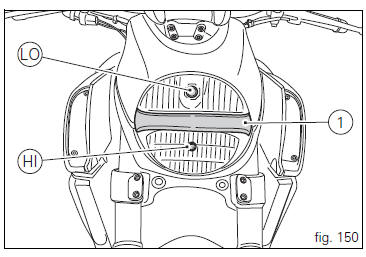
Fig. 150 Shows the locations of the low beam bulbs (lo), high beam bulbs (hi) and the parking light bulb (1).

Headlight
 Important
Have the high and low beam bulbs replaced by a ducati dealer or an authorised service centre.
 Warning
The headlight might fog up if the vehicle is used under the rain or after washing.
Switch headlight on for a short time to dry up any condensate.
 Chain lubrication
The chain fitted on your motorcycle has o-rings that keep dirt
out of and lubricant inside the sliding parts.
So as not to damage these seals when cleaning the chain,
use special solvents and avo ...
 Beam setting
When checking beam setting, put the motorcycle upright.
Tyres should be inflated at the correct pressure and one
person should be sitting astride the motorcycle, keeping it at
right angles to its ...
Other materials:
Fuel system circuit
The fuel system circuit consists of:
An electric pump, driven by the injection relay, which is in turn
controlled by the ecu (engine control unit)
A fuel filter
A pressure regulator
Two injectors (one per cylinder, located downstream of throttle valve)
The plastic mounting shown in t ...
Oil pump
Complete oil pump assembly
O-ring
Circlip
O-ring
Pump body
Circlip
Reducer bush
Spring washer
Screw
Screw
Spring washer
Pump drive gear
Key
By-pass plug
Locating bush
By-pass spring
By-pass valve
Spare parts catalogue
Diavel abs filters and oil pump
Diavel ...
Distance travelled on fuel reserve: trip fuel
This function shows the distance travelled on fuel reserve (in km or miles
depending on the specific application).
When the fuel light comes on, the display automatically switches to the "trip
fuel" indicator.
Trip fuel reading remains stored even after key-off until the vehicle is
refue ...