
Ducati Diavel Service Manual: Dashboard system
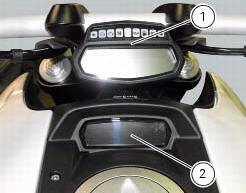
The vehicle is equipped with two dashboards: an lcd (1) located on the handlebar containing the key indications (speed, rpm, engine coolant temperature, and clock) and a tft colour display (2) located in the tank fairing displaying trip information (riding style set, odometer, consumption, average speed, etc.) And the setting menu for activating and setting the various functions.
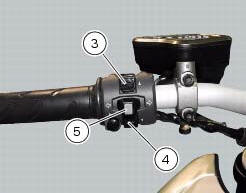
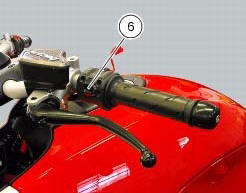
The type of information shown can be selected by two push-buttons (3) and (4), the turn indicator reset button (5) and the high-beam flashing button (6) on the lh switch.
In the dashboard on the handlebar there are six warning lights (three each side), and a further auxiliary warning light indicating when the "over rev" limit is reached and when the dtc is activated.
The dashboard on the tank (2) automatically sets the background colour according to the exterior lighting conditions.
When sensor detects "poor lighting" (night), it switches to black background mode; vice versa when a "significant" lighting is detected (day), it switches to white background mode. It is nevertheless possible to customise this function through the "setting" menu function "back light - dashboard 1", and possibly set one of the two modes available, night or day, as permanent setting (or go back to auto mode).
To protect the backlight leds in the event of voltage spikes, they are disabled if the power supply voltage exceeds 16 volts; if the power supply voltage drops below 6 volts, the leds switch off as general dashboard functionality is no longer ensured.
Indicator lights
- The following lights are mounted on the handlebar dashboard:
- Neutral light n (green): illuminates when the gearbox is in neutral.
- Low fuel light (amber yellow): illuminates when there are approximately there are about 4 litres of fuel left in the tank.
- Turn signal lights (green): illuminate and flash when the corresponding
turn signal is in operation.
If a turn signal does not work (e.G. Burnt out bulb) its incorrect operation is signalled by making the light flash twice as fast as in comparison to correct operation.
- Engine oil pressure light (red): illuminates when engine oil pressure is too low. It must turn on at key-on, but must turn off a few seconds after the engine has started. The case may occur that the light turns on briefly if the engine is very hot; it will turn off as the engine rpms increase.
- High beam light (blue): illuminates when the high beam headlight is on.
- "Engine/vehicle diagnosis - eobd" indicator (amber yellow): it turns on in the case of an engine or motorcycle error; in some cases the engine will be locked.
- "Over rev" rev limiter/traction control indicator "dtc" (red):
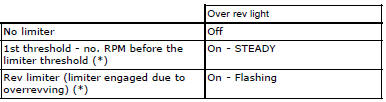
(*) Depending on the model, each calibration of the engine control unit may
have a different "setting" for the thresholds
that precede the rev limiter and the rev limiter itself.


Note
If the over rev function light and the dtc intervention light should both come on at the same time, the dashboard gives priority to the over rev function.
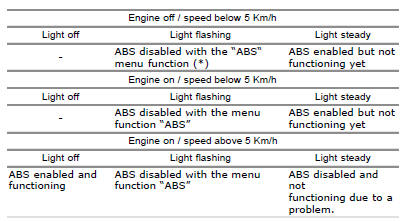
12 Abs light (amber yellow).
This turns on to indicate that abs is disabled or not functioning.
 Dashboard
Note
The dashboard is supplied as a single component; its internal components
cannot be renewed separately.
Important
Whenever the dashboard is renewed, the ignition key programming procedure
m ...
 Lcd unit functions
Speedometer.
Gives road speed
Rev counter.
Indicates engine revs per minute.
Clock.
Water temperature indicator.
Indicates engine coolant temperature.
Important
Stop riding if ...
Other materials:
Key-on/key-off using the red key on the handlebar with the passive key
A key-on can be performed by pressing the red button (6) on
the handlebar in the hands free on/off position and in
the presence of the passive key (4, fig. 77).
Note
The passive key (4, fig. 77) Has a range of a few cm,
therefore the key (4, fig. 77) Must be positioned near the
antenna (2). R ...
Electric system
Basic electric items are:
headlight:
low beam bulb type: 1xh7 blue vision (12v-55w);
high beam bulb type: 1xh1 (12v-55w);
parking light: led (12v-2.4W).
Electrical controls on handlebars.
Turn indicators:
front: led (13.5V-2.9W).
Horn.
Brake light switches.
Sealed battery, 12v-10 ...
Trip 1 meter
This function shows the distance travelled since the trip meter was last
reset (in km or miles depending on the specific
application).
Press and hold (1) "s" for 3 seconds while in this function to reset the trip
odometer.
When the reading exceeds 9999.9, Distance travelled is reset and t ...