
Ducati Diavel Owners Manual: Beam setting
When checking beam setting, put the motorcycle upright.
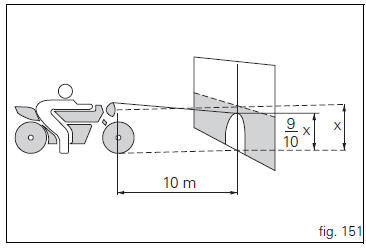
Tyres should be inflated at the correct pressure and one person should be sitting astride the motorcycle, keeping it at right angles to its longitudinal axis. Place the motorcycle opposite a wall or a screen, 10 meters apart from it, draw a horizontal line on the wall at the height of the centre of the headlight and a vertical one in line with the longitudinal axis of the motorcycle.
If possible, perform this check in dim light.
Switch on the low beam headlight.
The height of the upper limit between the dark area and the lit area must not be more than nine tenths of the height of the centre of the headlamp from the ground.
 Note
Note
The procedure described here is in compliance with the italian standard establishing the maximum height of the light beam.
Owners in other countries should adapt this procedure to the regulations in force in the country where the motorcycle is used.
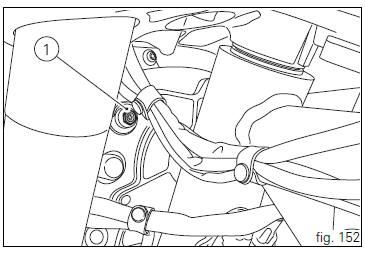
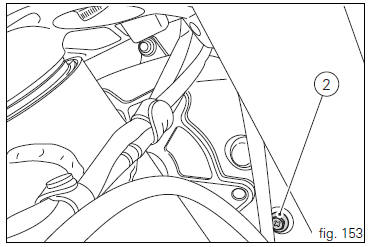
To adjust the headlight beam vertically, turn the screws (1), for horizontal adjustment, turn the screw (2).
 Replacing the high and low beam bulbs
Before replacing a burnt-out bulb, make sure that the new
bulb complies with the voltage and wattage specified in the
"wiring diagram", page 179. Always test the new bulb
before refitting ...
 Rear-view mirror adjustment
The rear-view mirror can be adjusted manually by pressing
points (a).
...
Other materials:
Removal of the cooling system hoses and unions
Loosen the clips (21) that secure the radiator/thermostat sleeve (40) and the
radiator/plug sleeve (24) to the water
radiators.
Loosen clips (25) and (43) that secure the breather pipe (26) to the
radiator/plug sleeve (24) and to the left radiator.
Loosen the clips (34) securi ...
Reassembly of the clutch-side crankcase cover
Fit the plug (14) and the gasket (13). Fit the plug (17) and the gasket (15).
If the bush has been replaced, fully seat the new bush (7) in the slot in the
cover using a suitable drift and a press.
If the sealing ring (8) needs to be renewed, fit the new seal into the crankcase
cover, po ...
Exhaust by-pass valve not working correctly
Fault codes
Dds: exvl diagnosis -> position error, potentiometer, short circuit to ground
or open circuit (s.C. Gnd or c.O.),
Potentiometer short circuited to vdc (potentiometer s.C vdc).
Dashboard: the error "exvl" (exhaust bypass valve) is shown on the service
display. The eobd warning ...