
Ducati Diavel Owners Manual: Tubeless tyres
Front tyre pressure: 2.50 Bar (rider only) - 2.6 Bar (with passenger and/or bags) rear tyre pressure: 2.50 Bar (rider only) - 2.6 Bar (with passenger and/or bags) as tyre pressures are affected by changes in temperature and altitude; check and adjust them whenever you are riding in areas where there are large variations in temperature or altitude.
 Important
Check and adjust the pressures with the tyres cold.
To prevent distortion of the front wheel rim, increase tyre pressure by 0.2×0.3 Bar when riding on bumpy roads.
Tyre repair or change (tubeless tyres)
With minor punctures, tubeless tyres take a long time to deflate, as they tend to hold the air inside. If you find low pressure on one tyre, check the tyre for punctures.
 Warning
Punctured tyres must be renewed.
Replace with tyres of the original brand and type.
Be sure to tighten the valve caps securely to avoid leaks when riding. Never fit tyres with inner tubes, as these can cause the tyre to burst suddenly, with possibly serious consequences for the rider and passenger.
After renewing a tyre, the wheel must be balanced.
 Important
Do not remove or alter the position of the wheel balancing weights.
 Note
Note
Have the tyres replaced at a ducati dealer or authorised service centre. Correct removal and installation of the wheels is essential.
As some parts of the abs (such as sensors and phonic wheels) are mounted to the wheels and require specific adjustment.
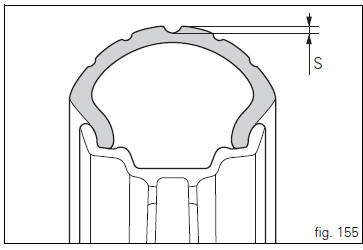
Minimum tread depth
Measure tread depth (s, fig. 155) At the point where tread is most worn down.
It should not be less than 2 mm, and in any case not less than the legal limit.
 Important
Visually inspect the tyres at regular intervals for cracks and cuts, especially on the side walls, and bulges or large stains that indicate internal damage. Replace them if badly damaged.
Remove any stones or other foreign bodies stuck in the tread.
 Rear-view mirror adjustment
The rear-view mirror can be adjusted manually by pressing
points (a).
...
 Checking engine oil level
Check the engine oil level through the sight glass (1) on the
clutch cover. When checking oil level, the motorcycle should
be perfectly upright and the engine cold. The oil level should
be between ...
Other materials:
Tips on how to select the sensitivity level
Warning
The 8 level settings of the dtc were calibrated using
tyres of the same make, model and size as those originally
fitted to the motorcycle.
The use of tyres of different size to the original tyres may
alter the operating characteristics of the system.
In the case of minor differenc ...
Explanation of the function of the ride-by-wire system
Mechanism
Via metal cables, the throttle grip operates a roller mounted on one end of a
spindle located near the horizontal cylinder
throttle valve spindle.
The aps sensor, which measures the position of the throttle grip itself, is
mounted on the opposite end of this spindle.
A mechanic ...
Menu 2 on/off function
This function turns off and back on the menu 2.
If menu 2 is disabled, the functions for average fuel
consumption (cons.Avg), instantaneous fuel consumption
(cons.), Average speed (speed avg), trip time (trip time)
and air temperature (air) will no longer be displayed in the
"main screen ...